Tags Screen
From the Tasks section of the navigation bar choose Tags to open the Tags screen:
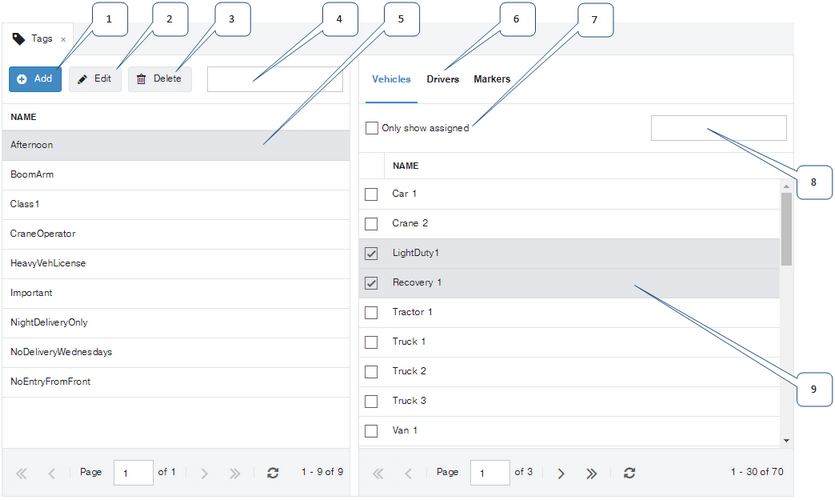
1: |
Click Add to define a new tag and add it to the list of defined tags. The Add dialog box opens, where you can give the new tag a name. Tag names cannot include any of the following characters: \, /, ', ", <, >, *, &, :, ?, %, #, space. |
||||
2: |
Click Edit to edit the name of the currently selected tag. |
||||
3: |
Click Delete to delete the currently selected tag. When you delete a tag, it is automatically removed from all vehicles and drivers it was assigned to. |
||||
4: |
Enter part or all of a tag name in the Filter field to filter the list of tags. As you type the list is filtered, and lists only tag names that match your entered text. |
||||
5: |
The list of currently defined tags. Click a tag to select it. The selected tag is highlighted in gray. |
||||
6: |
Click a tab to work with the tags assigned to Vehicles, Drivers, or Markers. |
||||
7: |
Select the Only show assigned check box to see vehicles, drivers, or markers that have the currently selected tag assigned to them. |
||||
8: |
Enter part or all of a vehicle, driver, or marker name in the Filter field to filter the list. As you type the list is filtered, and lists only vehicles, drivers, or markers that match your entered text. |
||||
9: |
List of vehicles, drivers, or markers.
|
 Previous
 Next
Next Expand/Collapse
 Print
Print Share Page
 Training
 Knowledge