Creating Markers
There are several ways to create markers. For all methods, navigate to the Main section of the navigation bar then choose Map to open the Map screen. Then, create a marker using one of the following methods:
| • | Right-click the marker's location on the map and select Create a marker here from the pop-up menu. |
| • | Right-click a vehicle marker on the map and select Create a marker here from the pop-up menu. |
| • | Search for a location and select Create a marker here from the info balloon that is displayed at the search result location you selected. |
| • | Click Markers  on the Map screen toolbar then click the map at the location where you want to create a marker. on the Map screen toolbar then click the map at the location where you want to create a marker. |
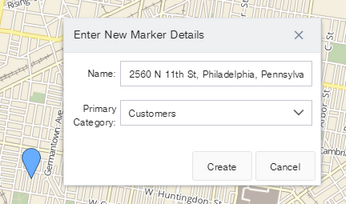
When you create a marker using any of these methods, a blue marker icon is displayed at the marker location, and the Enter New Marker Details dialog box opens:
|
The screenshot above shows the default appearance of the Enter New Marker Details dialog box. The dialog box can contain additional information that is enabled from the Map Settings dialog box. |
The Name field contains the marker address by default. You can edit this if necessary. Select a marker category from the Primary Category drop-down list, then click Create. A Marker Details pop-up is displayed. You can edit the default details of the new marker, add additional information, and define the shape of the marker, and any access paths and gates.
 Previous
 Next
Next Expand/Collapse
 Print
Print Share Page
 Training
 Knowledge