The Marker Categories screen lets you create, view, and edit marker categories. From the Tasks section of the navigation bar choose Marker Categories to open the Marker Categories screen.
1:
Create: Click Create to add a new category to the list. The new category is given the name "New", which you can edit to supply a more meaningful name.
2:
Delete: Click Delete to delete the selected (highlighted) category.
3:
Category list: The list of all defined categories is displayed on the left, with the selected category highlighted. Click a category name to select it. The category details are displayed on the right.
4:
Properties and Permissions: Tabbed pages provide information about the details of the selected category:
•
Properties let you specify the name of the category and control its appearance.
•
User Permissions lets you specify who has access to the category and what they can do with it.
•
Role Permissions lets you specify which roles have access to the category and what they can and cannot do with it.
User and role rights to the selected marker category can only be edited from the User Permissions and Role Permissions tabs if the marker has not been set as available to all users (that is, if the Available to all users check box has not been selected).
5:
Refresh: Click Refresh to re-populate the list of categories, incorporating any changes other users might have made.
6:
Navigation controls: If there are too many categories to fit on a single page, use the navigation controls to navigate between pages.
The Properties tab lets you view or edit the properties of a category:
1:
The name of the category. Use the edit box to enter a new name.
2:
The category icon. The icon is displayed on maps and lists for markers in this category and for vehicles when they stop at markers in this category. To change the icon, click the Change button and select a new icon.
3:
History Color. Select a color that is used as the background of all events in the history details list where the vehicle is stopped at a marker in this category.
4:
List Color. Select a color that is used as the background for all entries in the vehicles list where the vehicle is stopped at a marker in this category.
5:
Report Color. Select a color that is used to highlight entries in reports when a vehicle is stopped at a marker in this category.
6:
Map Color. Select the fill color used to identify markers of this category when viewed on the map as marker icons.
7
Content: Select the Show only markers owned by the viewing user check box if the category can be available to multiple users, but each user sees only those markers in this category that they own. That is, markers in this category always act like private markers, although the category itself can be either public or shared.
8:
Permissions: Select the Available to all users (Public) check box to allow all users to see and edit the marker category. If selected, the check box permissions shown on the User Permissions and Role Permissions tabs are disabled and set to their highest permission states, as all users and roles are given access to this category by default. Clear this check box to assign individual permissions to the category by subuser or role membership, or both.
Not all marker categories can be configured as "Private". System categories, such as "HQ", "Fuel Station", "Customers", and "Prohibited", are set to "Public" by default, and cannot be set to "Private" (the check box is selected and disabled for these categories).
9:
Contains depot markers: Select this check box to indicate that this category contains markers that can be treated as depots (that is, as alternative "HQ" category markers). If this option is selected any of the markers in this category can be chosen as base markers for vehicles and drivers, and can be used as the start or end locations for routes; for example, when creating routes in Verizon Connect® Dispatch™. Markers in this category are shown ahead of "HQ" marker categories when choosing a vehicle or driver base location. If no marker categories are configured with this check box, only "HQ" category markers are available as base markers for vehicles, drivers, and as start and end locations for routes.
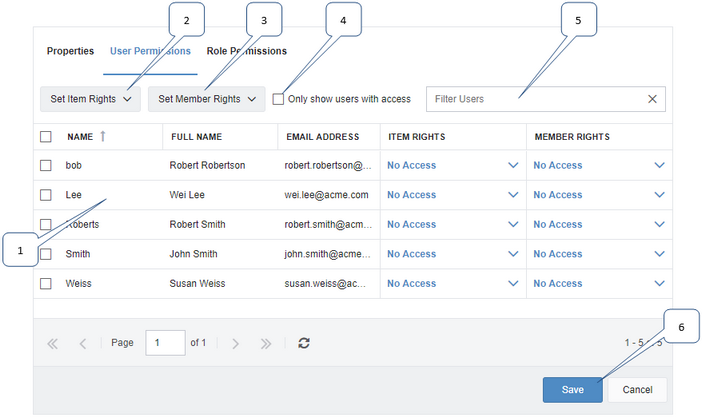
The User Permissions tab lets you control how much access other users have to this category.
1:
Click an entry in the Users list to select the user. Details about the user are shown in the users list. If the category is private (that is, not public), drop-down menus located in the upper portion of this page can be used to specify the rights given to selected subuser accounts to work with or to see markers in the category. You can also use the drop-down menus to the right of individual account rows in the grid to specify the rights of individual accounts.
2:
Use the Set Item Rights drop-down menu to change the rights the selected users have for working with (adding, removing, renaming and deleting) markers in categories that are not public (Properties tab). Select the check box beside every account you want to edit permissions for, then choose an item from this menu and click the Save button. To globally edit the rights of all users in the list, select the check box in the header row to select all subusers in the fleet or team. To edit the rights of individual subuser accounts, you can also use the drop-down menus to the right of individual accounts in the grid. The possible levels of rights are:
•
No Access: User has no rights to change the category.
•
Can add and remove markers from the category: User can add or remove markers from the category, but not edit the category details.
•
Can add and remove markers from the category and rename it: User can edit the category details as well as adding and removing markers.
•
Can add and remove markers from the category and rename and delete it: User has full rights for working with the category, including adding and removing markers, editing details, and deleting the category.
3:
Use the Set Member Rights drop-down menu to change the rights the selected users have to see, view details of, or edit details of markers in categories that are not public (Properties tab). Select the check box beside every account you want to edit permissions for, then choose an item from this menu and click the Save button. To edit the rights of individual subuser accounts, you can also use the drop-down menus to the right of individual accounts in the grid. The possible levels of rights are:
•
No Access: User has no access to view or work on the markers that have this as the primary category.
•
Can see only names and icons: User can see the names and icons for markers that have this as the primary category, but cannot see their details.
•
Can see all details: User can see markers in this category and can see their details, but cannot edit them.
•
Can see and edit all details: User can see markers in this category and can edit their details.
4:
Select the Only show users with access check box to filter the list of users so that it lists only those users who currently have permission to see the category.
5:
Enter all or part of a user name in the Filter Users box to filter the list of users.
6:
Click the Save button to apply your changes to the category. Changes to user rights only take effect after the user next logs in.
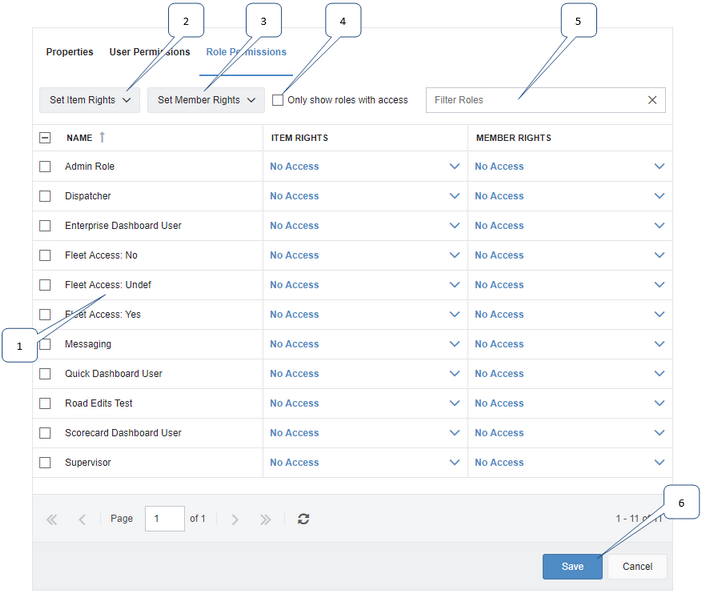
The Role Permissions tab lets you control how much access different roles, and therefore the users who have been assigned these roles, have to this marker category.
1:
Click an entry in the Roles list to select the role. Details about each role is shown in the roles list. If the category is private (that is, not public), drop-down menus located in the upper portion of this page can be used to specify the rights given to selected roles to work with or to see markers in the category. You can also use the drop-down menus to the right of individual roles rows in the grid to specify the rights of individual roles.
2:
Use the Set Item Rights drop-down menu to change the rights the selected role has for working with (adding, removing, renaming and deleting) markers in categories that are not public (Properties tab). Select the check box beside every role you want to edit permissions for, then choose an item from this menu and click the Save button. To globally edit the rights of all roles in the list, select the check box in the header row to select all roles. To edit the rights of individual roles, you can also use the drop-down menus to the right of each role in the grid. The possible levels of rights are:
•
No access: Role members have no rights to change the category.
•
Can add and remove markers from the category: Role members can add or remove markers from the category, but not edit the category details.
•
Can add and remove markers from the category and rename it: Role members can edit the category details as well as adding and removing markers.
•
Can add and remove markers from the category and rename and delete it: Role members have full rights for working with the category, including adding and removing markers, editing details, and deleting the category.
3:
Use the Set Member Rights drop-down menu to change the rights the selected roles have to see, view details of, or edit details of markers in categories that are not public (Properties tab). Select the check box beside every role you want to edit permissions for, then choose an item from this menu and click the Save button. To edit the rights of individual roles, you can also use the drop-down menus to the right of each role in the grid. The possible levels of rights are:
•
No Access: Role members have no access to view or work on the markers that have this as the primary category.
•
Can see only names and icons: Role members can see the names and icons for markers that have this as the primary category, but cannot see their details.
•
Can see all details: Role members can see markers in this category and can see their details, but cannot edit them.
•
Can see and edit all details: Role members can see markers in this category and can edit their details.
4:
Select the Only show roles with access check box to filter the list of roles so that it lists only those roles who currently have permission to see the category.
5:
Enter all or part of a role name in the Filter Roles box to filter the list of roles.
6:
Click the Save button to apply your changes to the category permissions for the selected role. Changes to user rights only take effect after the user assigned to this role next logs in.
Changing a Marker's Category
To change the primary category of a marker:
1.
From the Main section of the navigation bar choose Markers to open the markers list.
2.
Locate the marker you want to edit and click its name link. Use the Search or Advanced search controls if necessary. The Map is displayed, and shows the marker and the Marker Details pop-up.
3.
Click the Mini-map tab.
4.
Click Edit.
5.
Choose a new primary category from the Categories drop-down list.
6.
Click Save.
To change the additional categories of a marker:
1.
From the Main section of the navigation bar choose Markers to open the markers list.
2.
Select the check box next to the marker. You can select more than one marker if you are making the same change to multiple markers.
3.
Click the Set Categories button in the toolbar.
4.
Select and clear check boxes to specify which categories (other than the primary category) the selected markers belong to.
5.
Click OK.
Controlling the Categories that Appear on the Map
To specify the marker categories that are displayed on the map when no vehicle stops there:
1.
From the Main section of the navigation bar choose Map to open the Map screen.

 in the Map screen toolbar. The Map Settings dialog box opens.
 Previous
 Next
Next Expand/Collapse
 Print
Print Share Page
 Training
 Knowledge