The Map
The Map View shows the current location of all vehicles in the active fleet. This makes it easy to view details on individual vehicles without losing the global view of the entire fleet.
|
If a new vehicle has recently been added to your account, it might be displayed in the Vehicles list, but not on the Map View. This is because new vehicles are created with an initial location centered at Los Angeles International Airport in California. To prevent large and unexpected clusters of vehicles being displayed on the map, any vehicles located within this "scan zone" are hidden from the map. If you select one of these new vehicles from the Vehicles list, this behavior is ignored and the vehicle is shown on the map, but it is shown as being on a street close to this default location (typically appearing as an address on Coastguard Road). This address is updated only when the vehicle reports its actual location to the fleet tracking system. |
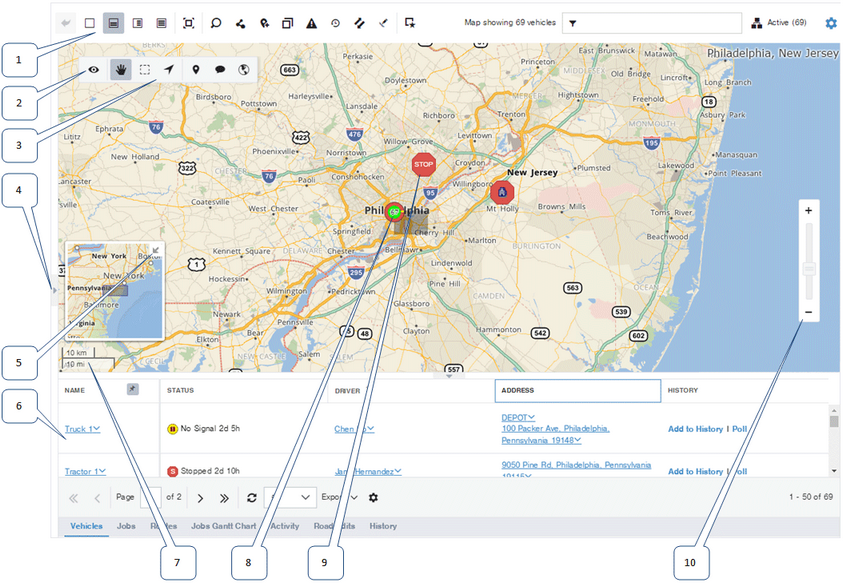
1: |
Toolbar: The map screen toolbar contains buttons for performing most tasks you can accomplish using the map. |
||||||||||||
2: |
Show All button: Click here to zoom the map so that all the vehicles in your fleet are showing. |
||||||||||||
3: |
Map controls: Map control buttons let you set the state of the map. Selected buttons are shown with a dark gray background. The map states that you can set are:
|
||||||||||||
4: |
Docking tab: Click the docking tab to open or close a docking region on the side of the map where you can dock pop-ups. |
||||||||||||
5: |
Overview map and control: The mini-map lets you see the broader context of the location you are viewing in the main map. When the map is showing, click the link in the upper right corner to hide it. When the mini-map is hidden, click the arrow in the lower left corner to display it (the map must be zoomed in for the mini-map to be displayed). |
||||||||||||
6: |
List view area: Tabbed regions can optionally be displayed below, to the right of, or instead of the map where you can lists such as the vehicles list or history timelines. |
||||||||||||
7: |
Scale: The scale of the map is shown in both metric (kilometers) and imperial (miles) units. |
||||||||||||
8: |
Vehicle icon: When a vehicle is alone in a map location, it is shown using an icon that represents the vehicle's status or, if the vehicle is stopped at a marker, the category of the marker where it is stopped. Right-click to open a contextual menu from which you can perform additional tasks relating to the vehicle. |
||||||||||||
9: |
Cluster icon: If there are so many vehicles in an area of the map that their icons would interfere with each other, the map displays a cluster icon to let you see at a glance information about all the vehicles in the area. |
||||||||||||
10: |
Zoom control: Use the + and - buttons or drag the slider to zoom the map in and out. |
In addition to the tools described above, you can:
| • | Double-click a new center point to re-center the map. |
| • | Use the mouse wheel to zoom in and out. If you do not have a mouse wheel, you can use the zoom control on the screen. |
| • | Click on the icons for vehicles or clusters to display info balloons, which provide more detail about what the icon represents. |
 Previous
 Next
Next Expand/Collapse
 Print
Print Share Page
 Training
 Knowledge


