A service plan contains a string of service schedules. Each of these service schedules describes a service type and the frequency that the service should be performed. A plan can contain a large number of scheduled services, or only one, and the services can be configured to repeat indefinitely, or to be performed only once. Only plans can be assigned to vehicles.
•
Service Plans are lists of the service schedules that should be carried out on the vehicles that have been assigned the plan.
•
A ServiceSchedule specifies the type of service that must be performed, and the frequency that it should be carried out. Schedules are based on generic pre-configured service types, but can be modified to meet the specific needs of an individual vehicle by adjusting the interval type between services (time, distance driven, engine hours, or a combination of these), and the interval period.
•
Service Types contain detailed breakdowns of the cost of individual services. They can also contain details of how often the service should be performed, however this is not mandatory and these settings can be overridden by the Service Schedule settings if needed.
To add a new service plan:
1.
Click the Service Plans link on the menu. The Service Plans tab opens, displaying a list of your existing plans.
2.
Click New Plan. The Create Service Plan dialog box opens.
3.
Type the name of your new plan into the Plan Name field.
4.
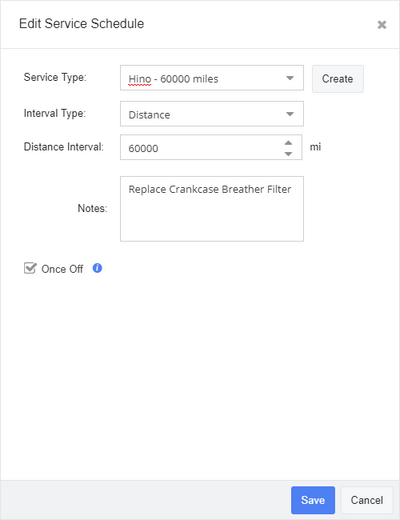
Click Add. The Add New Service Schedule dialog box opens: Enter the details of the new service schedule:
o
Service Type - Select a previously configured service type from the drop-down menu, or click Create to add a new service type. Note that you can only apply a given service type once to a vehicle (you cannot, for example, apply the same service type to the same vehicle twice with different interval period values).
o
Interval Type - Select the interval type schedule from the drop-down menu. Note that the dialog box automatically populates with the interval type configured for the service type selected in the previous step, but this can be changed if required. This setting can be specified in terms of "Date", "Distance and Date", "Engine Hours", "Date or Engine Hours", or "Distance and Engine Hours". Dates are measured in months, and distances in miles.
o
Number - This field only becomes available after an interval type has been chosen in the previous step. Use this field to enter the interval period (number of months, miles or engine hours) between services of this type for this particular vehicle. As with the previous field, this value is automatically populated with the default value specified for the service type, but can be edited directly if required.
o
Notes - Use this field to enter any general information about the service schedule.
5.
Click Save on the Add New Service Schedule dialog box. The new schedule is created, and you are returned to the Create Service Plan dialog box. Repeat step 4 as many times as required to add as many service schedules as are needed to the plan.
6.
Click Save on the Create Service Plan dialog box when you have finished adding service schedules. Your plan is now ready to be assigned to a vehicle. Note that plans must contain at least one schedule to enable the Save button.
7.
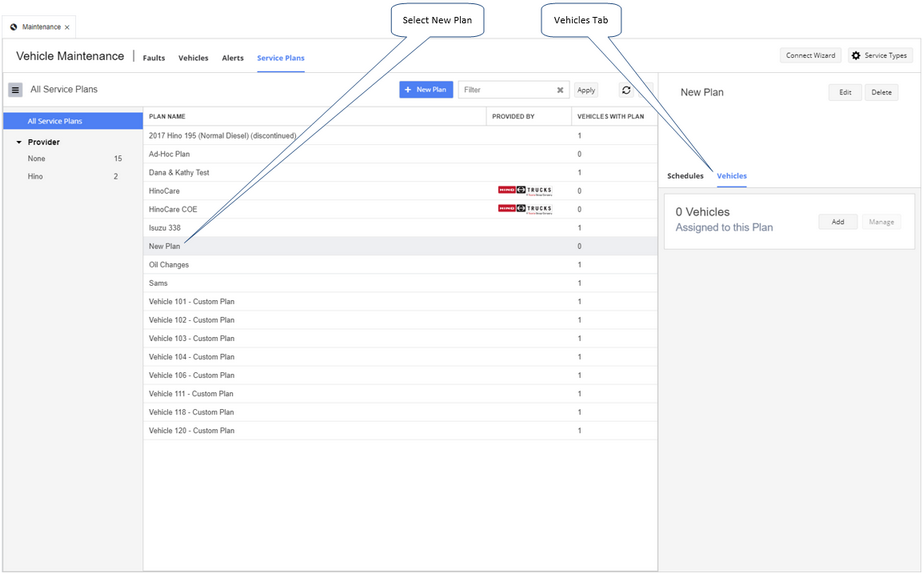
Click your newly created plan in the grid, then in the right details panel click the Vehicles tab:
8.
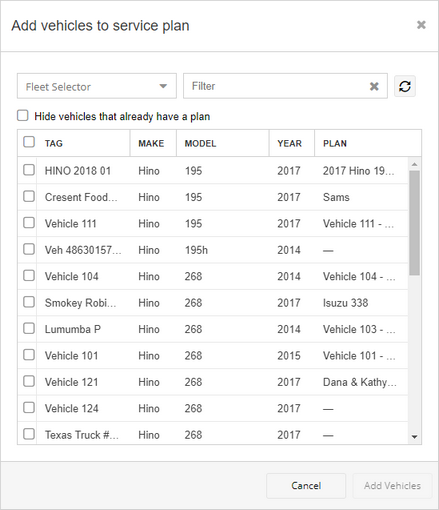
Click Add. The Add Vehicles to Service Plan dialog box opens:
9.
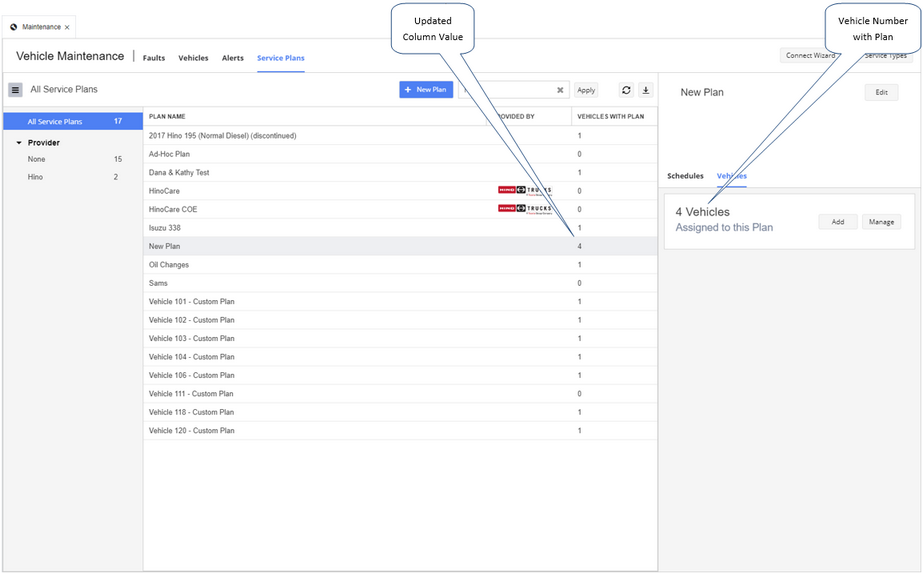
Select the check box beside every vehicle you want to assign this plan to, then click Add Vehicles. If a vehicle you select has already been assigned a plan, your new plan assignment immediately overwrites that assignment. The plan is assigned to the selected vehicles, and the number shown on the Vehicles tab, and under the Vehicles With Plan column on the Service Plans screen, is updated to reflect the new number of vehicles using the plan:
To remove or change a service plan on an individual vehicle once it has been applied, open the Vehicles tab and locate the vehicle you want to edit. Select the vehicle, then in the right details panel, click the Service Plan tab. The details of the vehicle's current service plan are shown.
•
To remove the plan, click the Actions menu then select Remove Plan.
•
To change the plan, click the Actions menu then select Change Plan. Click Yes, and the Assign Plan dialog box opens. Select a different plan from the Choose Plan drop-down list, then click Assign. The previous plan is removed, and the new plan assigned to the vehicle.
To edit or delete an existing service plan:
1.
Click the Service Plans link on the menu. The Service Plans tab opens, displaying a list of your existing plans.
2.
Click Delete in the details panel to remove the plan, or Edit to change the plan's name. Only plans that are not currently in use (that is, assigned to any vehicles) can be deleted. To edit the schedules that make up the plan itself, click the Schedules tab on the right details panel:
3.
To edit or delete an existing schedule for this plan, select it from the list of schedules on the details panel. Next, click the Action menu then select the Edit or Delete options from the menu that opens.
o
If you are deleting a service schedule from the plan, a confirmation dialog box opens. Click Yes to delete the schedule, or No to cancel the action.
o
If you are editing the service schedule, the Edit Schedule dialog box opens. Edit the schedule's details as needed, then click Save.
4.
Click Add to add a new schedule to the plan. The AddNew Service Schedule dialog box opens. Enter the details of the service schedule:
o
Service Type - Select a previously configured service type from the drop-down menu, or click Create to add a new service type. Note that you can only apply a given service type once to a vehicle (you cannot, for example, apply the same service type to the same vehicle twice with different interval period values).
o
Interval Type - Select the interval type schedule from the drop-down menu. Note that the dialog box automatically populates with the interval type configured for the service type selected in the previous step, but this can be changed if required. This setting can be specified in terms of "Date", "Distance and Date", "Engine Hours", "Date or Engine Hours", or "Distance and Engine Hours". Dates are measured in months, and distances in miles.
o
Number - This field only becomes available after an interval type has been chosen in the previous step. Use this field to enter the interval period (number of months, miles or engine hours) between services of this type for this particular vehicle. As with the previous field, this value is automatically populated with the default value specified for the service type, but can be edited directly if required.
o
Notes - Use this field to enter any general information about the service schedule.
5.
Click Save. The new schedule is created, and can now be assigned to a service plan. If the new schedule is not displayed in the grid immediately, click Refresh in the upper right corner of the screen. To edit the details of the schedule, select it from the list and click Edit.


 Previous
 Next
Next Expand/Collapse
 Print
Print Share Page
 Training
 Knowledge