Using Form Template Style Sheets
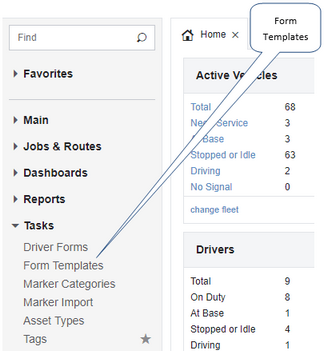
Form data submitted from drivers using the Verizon Connect® WorkPlan™ mobile application is presented via the Driver Forms section. The forms shown in this section are converted from their raw form using the XSLT transformation language. This transformation process determines how any given form is presented in your browser, much like a style sheet is used to determine how an HTML web page is presented.
XSLT template files can be used to:
| • | Adjust the layout of form pages, including table, row, column and cell number, size, and alignment; and specify font faces, sizes, and colors. |
| • | Run conditional tests against XSL form content to determine what and how available form content is shown. |
| • | Add form content such as line breaks, horizontal rules, and images (such as logos), or to replace default form content (for example, radio or check box responses) with images. |
This section describes how to format and upload XSLT files to customize the appearance of submitted driver forms in the platform interface.
|
XSLT language conventions are not discussed in this guide, and a basic understanding of this language is required to fully exploit the capabilities of this feature. See http://www.w3schools.com/xsl/default.asp for tutorials explaining basic XSLT concepts. |
Customized XSLT style sheets are accepted by the platform in one of two ways:
| 1. | By uploading a single .XSLT format file and associating it with a form template. The styles contained in this file are used to overwrite the default platform styles. |
| 2. | By uploading a zipped archive (.zip) that includes a single .XSLT file at its root level, and a folder named "stylesheetFiles" that contains any resources linked to from the XSLT file (such as images). |
Only XSLT format files are supported. If you attempt to upload formats of any other type, the upload is canceled.
|
To download an example XSLT file and resources, click here. Use these files in conjunction with the information presented below to generate your own style files. |
Customized XSLT files are applied to form templates individually, and can be removed at any time. Doing so reverts all forms that use the form template to their default appearance.
Form data is divided into three distinct categories:
Form data is always displayed in the order listed above (form instance data in the upper part of the form, metadata below this, and form components in the lower part of the form) when generated in the platform interface, but you can choose what and how this content is presented within these constraints. Form instance and metadata text and integer content that might be available to you (depending on the data submitted by a given form), and that can be styled, includes: Form Instance Attributes
Form Metadata Attributes
Printing and Formatting Form Data Form instance and metadata information can be shown on, or omitted from, forms as required according to the specific information you want to present. You might, for example, want some form types to include all available information, while others might be better kept as light as possible (such as including only the date of the form's submission and the name of the driver who submitted it). This text and integer data can be printed on your forms (within the metadata and //instance template sections of the XSLT file) using simple XSLT code, as demonstrated below; removed entirely, or shown only under certain conditions (for example, only if the requested data is actually available). Code Examples: Writing the form template name: <xsl:attribute-set name="title"> <xsl:attribute name="font-family">Tahoma</xsl:attribute> <xsl:attribute name="font-size">18pt</xsl:attribute> <xsl:attribute name="font-weight">bold</xsl:attribute> <xsl:attribute name="padding">2mm</xsl:attribute> <xsl:attribute name="text-align">left</xsl:attribute> <xsl:attribute name="color">green</xsl:attribute> </xsl:attribute-set>
<xsl:template match="//instance"> <fo:flow flow-name="xsl-region-body"> <fo:block xsl:use-attribute-sets="title"> </fo:flow> </xsl:template> The example above prints Form Template Name: <Form Template Name> (or simply Form Template Name: if the requested template name data is not available) in bold green text, as specified by the title attribute set. To run a simple test on form data, and print information only when it is available: <xsl:if test="/forms//instance/metadata/driver/text()"> <!-- If yes, print the following... --> <fo:block xsl:use-attribute-sets="title"> <xsl:text>Driver Name:</xsl:text> <xsl:value-of select="/forms//instance/metadata/driver/text()" /> </fo:block> </xsl:if> <!-- If no, do nothing... --> Prints Driver Name: <Form Template Name> if a driver name is available; otherwise, nothing is printed. To print data when it is available, and alternative text when it is not: <fo:block xsl:use-attribute-sets="title"> <xsl:choose> <!-- Is a location available? --> <xsl:when test="/forms//instance/metadata/fullAddress/streetNumber/text()"> <!-- Yes, so print the address... --> <fo:block xsl:use-attribute-sets="title"> <xsl:text>Location: </xsl:text> <!-- The location --> <xsl:if test="/forms//instance/metadata/fullAddress/streetNumber/text()"> <xsl:value-of select="/forms//instance/metadata/fullAddress/streetNumber/text()" /> <xsl:text> </xsl:text> </xsl:if> <xsl:if test="/forms//instance/metadata/fullAddress/streetName/text()"> <xsl:value-of select="/forms//instance/metadata/fullAddress/streetName/text()" /> <xsl:text>, </xsl:text> </xsl:if> <xsl:if test="/forms//instance/metadata/fullAddress/building/text()"> <xsl:value-of select="/forms//instance/metadata/fullAddress/building/text()" /> <xsl:text>, </xsl:text> </xsl:if> <xsl:if test="/forms//instance/metadata/fullAddress/suburb/text()"> <xsl:value-of select="/forms//instance/metadata/fullAddress/suburb/text()" /> <xsl:text>, </xsl:text> </xsl:if> <xsl:if test="/forms//instance/metadata/fullAddress/city/text()"> <xsl:value-of select="/forms//instance/metadata/fullAddress/city/text()" /> <xsl:text>, </xsl:text> </xsl:if> <xsl:if test="/forms//instance/metadata/fullAddress/country/text()"> <xsl:value-of select="/forms//instance/metadata/fullAddress/country/text()" /> </xsl:if> <!-- Also show a tick icon --> <fo:external-graphic src="stylesheetFiles/success.png" /> </fo:block> </xsl:when> <xsl:otherwise> <!-- No, so write a customized message... --> <fo:block xsl:use-attribute-sets="title"> <xsl:text>Location: </xsl:text> <xsl:text>GPS is too weak</xsl:text> <!-- Also show a cross icon --> <fo:external-graphic src="stylesheetFiles/failure.png" /> </fo:block> </xsl:otherwise> </xsl:choose> </fo:block> Prints: Location: <Street Number>, <Street Name>, <Building Name>, <Suburb Name>, <City Name>, <Country> (if a street number is available; otherwise, prints Location: GPS is too weak). This example also displays one image when an address is available (success.png) and another when it is not (failure.png). To insert an image into displayed forms; for example, if you wanted to add a logo to the top of each page: <fo:external-graphic src="stylesheetFiles/FileName.png" content-height="scale-to-fit" height="100px" content-width="100px" scaling="non-uniform"/> Form Data Structure Form data is stored within the following folder structure: /forms//instance/<element1>/<element2>/<element3>/<element4>/ All form instance data is stored within /forms//instance/ (for example, /forms//instance/@name where @name is <element1>). Available form instance attributes are:
Form metadata is stored within /forms//instance/metadata/<element2> (for example, /forms//instance/metadata/job/text(), where job is <element2>). Available metadata attributes are:
Components within this structure can be styled individually. For example, to create a style available to all content within the root, /forms, the following might be used: <xsl:template match="/forms"> <fo:root xmlns:fo="http://www.w3.org/1999/XSL/Format"> <fo:layout-master-set> <fo:simple-page-master master-name="A4" page-width="210mm" page-height="297mm" margin-top="1cm" margin-bottom="1cm" margin-left="1cm" margin-right="1cm"> <fo:region-body margin-left="10mm" margin-right="10mm" margin-top="10mm" margin-bottom="10mm" /> <fo:region-before extent="2cm" /> <fo:region-after extent="2cm" /> <fo:region-start extent="2cm" /> <fo:region-end extent="2cm" /> </fo:simple-page-master> </fo:layout-master-set> <xsl:apply-templates /> </fo:root> </xsl:template> The block above creates an A4 format master layout that can be applied to any form content, as all content is held within /forms (this layout can then be applied to //instance and metadata, for example, as illustrated in the next code example). Likewise, if you wanted to explicitly modify the style of metadata content, you could use the following: <xsl:template match="metadata"> <fo:page-sequence master-reference="A4"> <fo:flow flow-name="xsl-region-body"> <fo:table-row> <fo:table-cell xsl:use-attribute-sets="contentcell left"> <fo:block> <xsl:text>Date:</xsl:text> </fo:block> </fo:table-cell> <fo:table-cell xsl:use-attribute-sets="contentcell left"> <fo:block> <xsl:value-of select="../@created" /> </fo:block> </fo:table-cell> </fo:table-row> <xsl:if test="job"> <fo:table-row> <fo:table-cell xsl:use-attribute-sets="contentcell left"> <fo:block> <xsl:text>Job:</xsl:text> </fo:block> </fo:table-cell> <fo:table-cell xsl:use-attribute-sets="contentcell left"> <fo:block> <xsl:value-of select="job/text()" /> </fo:block> </fo:table-cell> </fo:table-row> </xsl:if> </fo:flow> </fo:page-sequence> </xsl:template>
<xsl:template match="fullAddress"> <xsl:if test="coordinates/latitude/text() and coordinates/longitude/text()"> <fo:table-row> <fo:table-cell xsl:use-attribute-sets="contentcell left"> <fo:block> <xsl:text>Location:</xsl:text> </fo:block> </fo:table-cell> <fo:table-cell xsl:use-attribute-sets="contentcell left"> <fo:block> <xsl:value-of select="coordinates/latitude/text()"/>, <xsl:value-of select="coordinates/longitude/text()"/> </fo:block> </fo:table-cell> </fo:table-row> </xsl:if> </xsl:template> In the example above, the first style is applied to metadata content, printing only the form date and the job name, if available, in the metadata form block. The second block is applied to the fullAddress component of the metadata content (/forms//instance/metadata/fullAddress/) and prints a latitude/longitude location if both /forms//instance/metadata/fullAddress/coordinates/latitude/text() and /forms//instance/metadata/fullAddress/coordinates/longitude/text() return true (that is, content is available for both). In addition to styling form instance and metadata values, user-submitted form components can also be adjusted, including the following:
Example: Specify the images used to represent the responses to check box elements: <xsl:template match="checkbox"> <xsl:variable name="id" select="@id" /> <xsl:variable name="versionId" select="ancestor::instance[1]/@versionId" />
<fo:table-row> <fo:table-cell xsl:use-attribute-sets="contentcell left"> <fo:block> <xsl:value-of select="@name" /> <xsl:if test="/forms//instance[@versionId = $versionId]//comments/commentThread[@itemId = $id]"> <fo:inline line-height="100%" baseline-shift="20%" font-size="xx-small"> <xsl:value-of select="count(/forms//instance[@versionId = $versionId]//comments/commentThread[@itemId = $id]/preceding-sibling::commentThread) + 1"/> </fo:inline> </xsl:if>: </fo:block> </fo:table-cell> <fo:table-cell xsl:use-attribute-sets="contentcell left"> <fo:block> <xsl:choose> <xsl:when test="@selected='true'"> <fo:external-graphic src="stylesheetFiles/checkbox_checked.png" /> </xsl:when> <xsl:otherwise> <fo:external-graphic src="stylesheetFiles/checkbox_unchecked.png" /> </xsl:otherwise> </xsl:choose> </fo:block> </fo:table-cell> </fo:table-row> </xsl:template> |
||||||||||||||||||||||||||||||||||||||||||||||||||||||||||||||||||||||||||||||||||||||||||||||||||||||||||||||||||||||||||
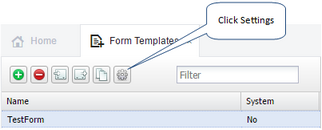
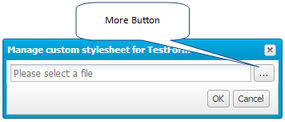
To upload a formatted XSLT file, or a zip archive that contains an XSLT file and a resource folder (stylesheetFiles):
|
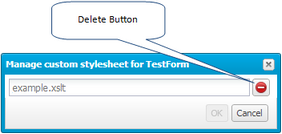
To remove an XSLT transformation file from a form template, reverting all forms using that template to the default style:
|
 Previous
 Next
Next Expand/Collapse
 Print
Print Share Page
 Training
 Knowledge


 . The custom style sheet dialog box opens.