Getting Started
This section contains key steps to get you started with the Navigation mobile application.
The maps used in this application can be saved to your device or accessed online with an internet connection. If you save the maps on your device, you can get directions even when you are offline. Follow these steps to download map data files:
| 1. | Connect to a WiFi network on your device. |
| 2. | Open the Navigation application and tap the Menu icon |
| 3. | From the All Maps tab, select the appropriate group, and then find the map data you need in the list. Ensure that you have sufficient storage space on your device to be able to download the map data. The file size is shown underneath the name of the map data. |
| 4. | Tap the Download icon |
|
On devices with SD card support, you can choose to download your map data from an SD card. Contact Verizon Connect support if you want to use this feature. |
2. Configure Your Preferred Settings
The settings you configure control things like how the application generates routes when you ask for directions, the measurement units used in the application, and other options. To configure your settings, tap the Menu icon ![]() then tap Settings. Any changes you make are automatically saved.
then tap Settings. Any changes you make are automatically saved.
The map shows by default. From other screens you can open the map by tapping the Menu icon ![]() then Map. Your map might look different to the image below, depending on the type of device you use.
then Map. Your map might look different to the image below, depending on the type of device you use.
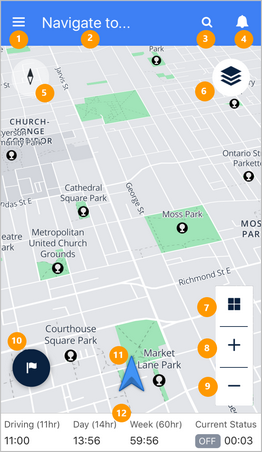
1 |
Access the main menu. |
2 |
Tap to select or enter a destination. |
3 |
Search for a destination. |
4 |
Reserved for future use. |
5 |
The map compass. Tap to switch between the map showing north as up and the direction of travel as up. |
6 |
Tap the Map Control icon to see points of interest on the map. |
7 |
Tap to change between 2D and 3D perspectives on the map. |
8 |
Zoom in on the map. |
9 |
Zoom out on the map. |
10 |
Tap to save the current location, and to provide feedback on it later. |
11 |
The arrow indicates your current location. |
12 |
Your HOS status clocks (if you are using Hours of Service in WorkPlan). |
4. Get directions to an address or point of interest
| • | To navigate to an address tap the Navigate to… field or the Search icon See Searching for Locations and Getting Directions for more information. |
| • | To navigate to a point of interest tap the Map Control icon  to view points of interest on the map. Tap a point of interest on the map to view a popup of the location’s details. Tap the Route icon again to clear the map of the points of interest. If you pan the map while points of interest are displayed, the Refresh POI button is displayed. Tap the button to refresh the points of interest. to view points of interest on the map. Tap a point of interest on the map to view a popup of the location’s details. Tap the Route icon again to clear the map of the points of interest. If you pan the map while points of interest are displayed, the Refresh POI button is displayed. Tap the button to refresh the points of interest. |
When you start driving, and you have the Motion Lock feature enabled in your account, you automatically enter Motion Lock mode, which prevents you from interacting with your mobile device screen.
If you are on the Guidance screen or on the Safety mode screen at the time, you will remain on this screen. If you are viewing the list of directions at the time, you will go to the Guidance screen or the Safety mode screen, depending on which screen you were on before viewing directions. If you are on any other screen, you will automatically switch to the Map screen in FollowMe mode.
 Previous
 Next
Next Expand/Collapse
 Print
Print Share Page
 Training
 Knowledge