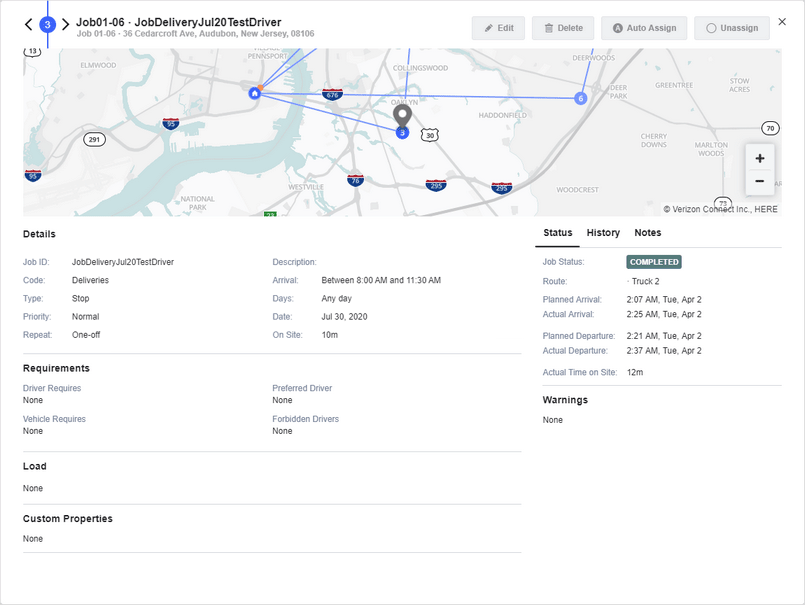
The Job Overview dialog box displays the following information:
| o | Job Name - The name of the job. If the job is assigned to a route, the position of this job in the route is shown to the left of the job name, together with left and right arrow buttons that allow you to move between the other jobs on the route. As you move up and down the jobs assigned to the route, the map and overview screen update to center on the selected job, and to display their details. |
| o | Job Address - The full street address at which the job occurs. |
| o | Job Location - The location of the job, as represented by a pin icon at a geographic location on a map. Use the zoom controls in the bottom right corner of the map to zoom in and out, or your mouse scroll-wheel, and drag the map with your mouse to pan it. |
| o | Job Type - The type of this job. |
| o | Job Priority - the priority of the job ("Lowest", "Low", "Normal", "High" or "Highest"). |
| o | Repeat - The interval after which the job repeats, if a recurring job, or 'One-off' if not. |
| o | Tags - The text tags associated with this job, if any. |
| o | Arrival - The times of day (time windows) during which this job can be serviced. |
| o | Days - The days of the week that the job can be serviced. For example, "Weekend" or "All". |
| o | Date - The calendar date of the job. |
| o | On Site - The length of time that will be, or was, spent at the customer site servicing this job; typically in hours and minutes, or minutes, but can also include seconds. |
| o | Driver Requires - The attributes that must be provided by the driver in order to complete this job. For example, a specific license type or qualification. |
| o | Vehicle Requires - The attributes that must be provided by the vehicle in order to complete this job. For example, specific capabilities such as PTO or refrigeration. |
| o | Preferred Driver - The preferred driver for this job. |
| o | Forbidden Driver - The drivers than can not be used to complete this job. |
| o | Load - The load type, if any, specified for this job. Also shown here is the quantity of each load, whether it is collected or delivered, and the load or unload time required to perform this task. |
| o | Status - The current status of the job ("Assigned", "En Route", "On Site", "Completed", or "Unassigned"). If the job is assigned to a route or has been completed, this area details the name of the route it is or was assigned to, and displays details such as the planned and actual arrival and departure times and dates of the job, and any job warnings. |
| o | History - The historical changes made to the job following its creation, together with the date and time each of these changes was made. Changes tracked include the job being created, updated, deleted, or its status changing. |
| o | Notes - The notes, if any, associated with this job. |
Use the Edit  , Delete , Delete  , Auto Assign , Auto Assign  , and Unassign , and Unassign  buttons in the upper right corner of the dialog box to either open the dialog box associated with these tasks, or to perform the task directly. See Editing Jobs, Deleting Jobs, Assigning Jobs to Routes, and Unassigning Jobs from Routes for more information. buttons in the upper right corner of the dialog box to either open the dialog box associated with these tasks, or to perform the task directly. See Editing Jobs, Deleting Jobs, Assigning Jobs to Routes, and Unassigning Jobs from Routes for more information.
|

 button in the upper right corner of the dialog box to close.
 Previous
 Next
Next Expand/Collapse
 Print
Print Share Page
 Training
 Knowledge