If a job has been created or imported from Verizon Connect® Scenarios™ in an unassigned state, or it has been unassigned from its previous route, the job should be assigned to a new route. This assignment task can be performed automatically by Verizon Connect® Dispatch™, or manually.
When a job is assigned automatically, the assignment engine will first attempt to assign the job to an existing route that best fits the job's location and time window settings, and then place it in the optimal position within this route. This won't always be possible if the job is scheduled to occur outside the existing routes' time windows, or if the job is too far away from the other jobs. If this is the case, the job must be assigned manually. In some cases, you might even need to create an entirely new route to contain the job.
Jobs can also be assigned manually to a specified route and its optimal position specified by Dispatch, or even entirely manually with both the route and job's position within that route explicitly defined.
Before manually assigning a job to a route, you can also run a route recommendation. This process can be used for both assigned an unassigned jobs. If you run a route recommendation process, the optimizer suggests the same optimal route that would otherwise be suggested by an automatic job assignment operation. However, it also suggests alternative routes that could service the job if, for whatever reason, you do not want to use the optimal route. After a recommendation operation, you will need to assign the job to your preferred job manually by dragging and dropping the job from the Jobs List onto a route on either the Daily Routes List, or the Route Timeline.
There are four ways to assign a job automatically: using the contextual menu, using the Auto Assign button () above the Jobs List, by clicking the white circle to the left of an unassigned job in the Jobs List, or by dragging and dropping jobs using your mouse. These methods are described below.
The contextual menu assignment method described below will only allow you to assign one job to a route at a time. To assign several jobs at once, use the alternative drag and drop method, or select the required jobs and use the Auto Assign button above the Jobs List. When assigning a job automatically using the Auto Assign button or drag-and drop methods, Verizon Connect® Dispatch™ will obey any exceptions you have specified as "critical" violations. This ensures that any routes created will not contain the conditions necessary to generate critical violations.
To assign a single job to a route automatically using only the Jobs List and the contextual menu:
1.
Locate the new or unassigned job in the Jobs List.
2.
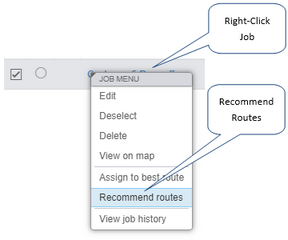
Right-click the job name. The contextual menu opens.
3.
Select the Assign to best route option. The job is assigned to a route automatically.
Or, to assign a single job to a route automatically using only the Jobs List and the assignment column:
1.
Locate the new or unassigned job in the Jobs List.
2.
Hover your mouse over the white circle icon to the left of the job name. An "A" appears within the circle, which also changes color, to gray.
3.
Click the circle icon. The job is assigned to a route automatically.
To assign one or more jobs to a route automatically using only the Jobs List and the Auto Assign button ():
1.
Locate the new or unassigned job or jobs in the Jobs List.
2.
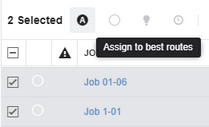
Select the check boxes beside the job names. The Auto Assign button activates.
3.
Click the Assign button. The jobs are assigned to a route automatically, if suitable routes are available.
To assign a job, or several jobs, automatically using the "drag and drop" method:
1.
Locate the new or unassigned job in the Jobs List. Select the checkbox beside every job you want to assign. If you are only adding a single job, there is no need to select the checkbox beside it.
2.
Drag a selected jobs toward the Route Timeline with your mouse. If you selected more than one job, these will be added to the drag selection automatically. As you start dragging, note the following two changes:
•
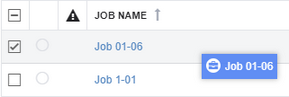
A pop-up text message is shown beside the job as you drag it. This indicates the name of a single job, or number of jobs you are assigning if more than one. Dragging a single job from the Jobs List Dragging two jobs from the Jobs List
•
The upper section of the Daily Routes panel is replaced with either one or two dotted boxes. The left box reads Drop here to auto assign. The right box reads Drop here to unassign. The second box appears only if the job or jobs you are dragging have already been assigned to a route.
3.
Drag the jobs you are assigning over the left Drop here to auto assign box and release. Dispatch now attempts to assign the jobs to the best matching route automatically, using the job locations and time windows to match with an existing, suitable route. If a suitable match is not found, either because it is too far away or if its addition would cause the route to exceed the route's time window or its driver's maximum shift length, the job is rejected and you must create a new route for the job.
You can also drag the job into a route row in the Daily Routes panel.Dispatch attempts to assign the job to the specified route, and automatically determine the best position for the new job.
To manually assign a job to a specific route and also specify the job's order in that route:
1.
Locate the new or unassigned job in the Jobs List.
2.
Locate the route you want to assign the job to in the Daily Routes List.
3.
Drag the job from the Jobs List into the route timeline on the Daily Routes List. If the driving distance of the new job is too far away from the route, the new job cannot be added. If this happens, you must assign the job to a route that passes closer to the new job's location, or create a new route for that job. If the job insertion causes a warning or critical violation to be generated, a warning message is shown listing the details of these violations. Job is too far away from the selected route
4.
Move the job along the route timeline to the position you want to add it in the route. This is the job's stop number. Two small arrows between the route's current jobs indicate where the job will be inserted in the route:
5.
Release the job. The route is recalculated to reflect the addition of the new job, and its position.
You can also add a job to a route using the map. This method does not allow you to specify the job's order in the route, however:
1.
Locate the job you want to add in the Jobs List.
2.
Locate the route you want to assign to job to in the Daily Route List.
3.
Click the Highlight button () beside the route's name on the Daily Routes List to display the route on the map. The map zooms and pans to the location of the route, which is also drawn on the map.
4.
Drag the job from the Jobs List to the map and onto the highlighted route. A pop-up message is shown beside the mouse cursor as you drag the job, showing the name of the job. When the mouse cursor is placed over the highlighted route the pop-up also indicates that the operation is assigning a job to a route:
5.
Release the mouse button.Dispatch attempts to add the job to the route. If accepted, the route is recalculated and the updated route shown on the map. This process can take a some time.
When requesting a route recommendation process, the optimizer suggests the same optimal route that would otherwise be suggested by an automatic job assignment operation. However, it also suggests alternative routes that could service the job if, for whatever reason, you did not want to use the optimal route. After a recommendation operation, you need to manually assign the job to your preferred route by dragging and dropping the job from the Jobs List onto a route on either the Daily Routes List or on the Route Timeline.
You can run a route recommendation process on both assigned and unassigned jobs. If you ask for recommended routes for a job that is already assigned to a route, the optimizer assumes that you don't want to use this route and does not suggest it to you.
To request a route recommendation on a single job using only the Jobs List and the Recommend button ():
1.
Locate the assigned or unassigned job in the Jobs List.
2.
Select the checkbox beside the job names. The Recommend button activates.
3.
Click the Recommend button. The Jobs List filter updates to show only the job, and the Daily Routes List is filtered to show only the routes that the optimizer suggests are suitable for the job. If the job is currently assigned to a route, this route is not shown as a recommendation. The Route Timeline shows the route that the optimizer has determined is the 'best' match for the job. This is the route that the job would have been assigned to automatically had you clicked the Auto Assign button.
4.
Click and drag the selected job in the Jobs List onto either the recommended route in the Route Timeline, or onto an alternative route shown in the Daily Routes List. The job is assigned to the route. If the job is already assigned to a job, it is unassigned from that route first and then assigned to the selected route.
To request a route recommendation on a single job using only the Jobs List or Map and the contextual menu:
1.
Locate the assigned or unassigned job in the Jobs List or on the Map.
2.
Right-click the job name. The contextual menu opens.
3.
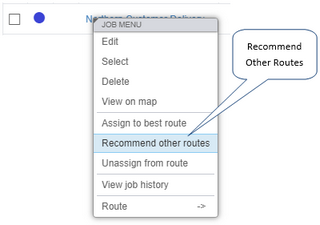
Select the Recommend routes option if the job is not currently assigned to a route, or the Recommend other routes option if the job is already assigned to a route. The Jobs List filter updates to show only the job, and the Daily Routes List is filtered to show only the routes that the optimizer suggests are suitable for the job. If the job is currently assigned to a route, this route is not shown as a recommendation. The Route Timeline shows the route that the optimizer has determined is the 'best' match for the job. This is the route that the job would have been assigned to automatically had you clicked the Auto Assign button.
4.
Click and drag the selected job in the Jobs List onto either the recommended route in the Route Timeline, or onto an alternative route shown in the Daily Routes List. The job is assigned to the route. If the job is already assigned to a job, it is unassigned from that route first and then assigned to the selected route.
 Assigning a Job by "Dragging and Dropping"
 Previous
 Next
Next Expand/Collapse
 Print
Print Share Page
 Training
 Knowledge
 ) above the


 ):
):