Creating New Road Edits
Create Edits Tab
To open the road editor, select the Map from the Main section of the navigation bar, then click the Road Edits button  in the upper toolbar. The Create Edits tab is displayed by default. It allows you to edit the speed limit, road status and other attributes of streets or street segments. A street segment is typically a section of a street or freeway running between two intersections, and is the basic unit of any road.
There are three methods for selecting the segments that have the same edits applied to them:
| • | Selecting the segments individually (Link Selection). |
| • | Selecting the segments as part of a route (Route Selection). |
| • | Selecting adjacent segments that are part of the same street using the expansion controls. |

1: |
Selection list: Contains streets and street segments that you have selected on the map. The Address field displays the street name and street number range, if known. The current speed limit (in mph or km/h) and the length (in miles or kilometers) of the street or street segment are also displayed. |
2: |
Selected segments: Street segments that are selected in the selection list are shown in blue, green, or red on the map. Road closures are shown in red. Segments that are being added as part of a route selection are shown in green. All other selected segments are shown in blue. Segments that are in the selection list, but do not have the check box selected next to them, are shown in gray. If one continuous street or street segment is selected in the list, the highlighted segment on the map displays start and end points, labeled A and B. |
3: |
Undo: Undo the last action that you performed. This button is disabled if there is no action to undo. |
4: |
Redo: Redo the last action that you reversed. This button is disabled if there is no action to redo. |
5: |
Link Selection: Use this mode to select segments individually. |
6: |
Route Selection: Use this mode to select segments as part of a route. |
7: |
Edit Selected: Opens the Road Edits dialog box for all street segments that have a check box selected beside them. This dialog box is used to edit the speed limit or other attributes, and to add optional text comments about any edits made. |
8: |
Remove Selected: Clears any streets and street segments from the selection list that have a check box selected beside them. |
9: |
Remove All: Clears all streets and street segments from the selection list, regardless of their selection state. |
10: |
Expansion Controls: Controls the degree of street expansion when a street segment has been selected. The number of button controls available varies according to the size of the street selected (that is, the number of street links it contains). Between zero and three buttons are shown beside each item. See Using the Expansion Controls for more information. |
11: |
The attributes for the selected street segments that have been edited. The Speed Limit is always displayed. Other attributes are displayed only if they have been edited. To hide the Attributes section click the arrow icon |
|
The speed and distance units used (MPH or miles, or km/h and kilometers) are determined by the default unit of the base map data (for example, MPH in the USA and km/h in Canada). |
The Road Edits dialog box opens when you click Edit Selected on the Create Edits tab or on the Manage Edits tab. The dialog box lets you edit the details for the currently selected street segments.
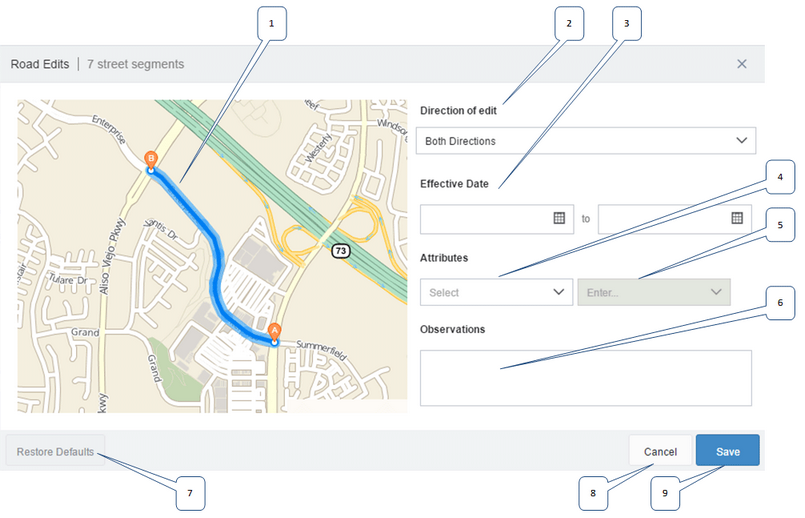
1: |
Selected segments: All street segments that are selected in the selection list are shown in blue or red (for road closures) on the map. If you have selected one continuous street segment in the list, the highlighted segment on the map displays start and end points, labeled A and B. If this is the case, you can select the direction for which to edit the attributes. |
||||||||||||||
2: |
Direction of edit: If you have selected one continuous street or street segment in the selection list, you can choose the direction in which the edit applies. This is useful if there is a closure, speed limit or other restriction, which applies only to one side of the road and not the other. The map on the left side shows where the points A and B are. By default edits apply into both directions. |
||||||||||||||
3: |
Effective Date: The two calendar controls allow you to select a date range for temporary road edits. Click the Calendar icon to the right of these controls, then select the start and end dates. To clear the date, click the Clear button |
||||||||||||||
4: |
Attributes: Select one of the following attributes:
When you have selected an attribute, a new row is displayed, with the drop-down box on the left listing all remaining attributes that can be selected. Click the Clear button |
||||||||||||||
5: |
Values: Enter a corresponding value for the attribute or select one of the options from the drop-down list. If you select Restore Defaults, the value is set back to the default that is stored in the base map data. |
||||||||||||||
6: |
Observations: Allows you to save freeform text comments about the edit. For example, the reason for a temporary closure or details about why the speed limit was changed. |
||||||||||||||
7: |
Restore Defaults: Resets all attributes of the streets or street segments in the selection list to their current map data values. |
||||||||||||||
8: |
Cancel: Closes the dialog box without making any changes. |
||||||||||||||
9: |
Save: Sets the streets or segments in the selection to the value for each selected Attributes field, or applies the Restore Defaults process. |
|
You cannot make changes to global road edits, which are available as part of the map data that you got from Verizon Connect. |
Creating New Road Edits
To create new road edits:
| 1. | Open the Map panel and click Road Edits in the upper Map toolbar. Select the Create Edits tab. The Road Edits panel opens and the cursor changes to a circular street picker tool. |
| 2. | Zoom in to the map until you can clearly see the street or street segment that you want, and the Zoom in to edit roads message at the top of the map is no longer visible. To prevent inaccurate selection, you cannot select streets at low zoom levels. |
| 3. | Choose one or a combination of the following methods for selecting street segments: |
|
| 4. | Click the Edit Selected button to open the Road Edits dialog box. |
|
| 4. | Click Apply. The road edits are then applied to all street segments in the selection list and highlighted on the map. |
| 5. | When you are satisfied that the edit is complete, click Remove All. This clears all streets and street segments from the selection list. |
All edited street segments are now visible on the map in blue (or red if the road status is "Closed"). These colored segments are visible at all map zoom levels, making them easy to locate on the map. Additionally, all edits are displayed on the Manage Edits tab, including the details about what was edited, the time of the edit, and the account that was used to make the edit.
Selecting Segments Individually
To select street segments individually:
| 1. | From the Road Edits panel toolbar click the Link Selection icon |
| 2. | Hover over a street or street segment on the map using the street picker. Any street segments close to the street picker are highlighted in blue. When clicked, the selected street segment is highlighted in blue on the map, and added to the selection list. |
| 3. | Repeat adding street segments to the selection until you are finished. |
Selecting Segments as Part of a Route
To select street segments as part of a route:
| 1. | From the Road Edits panel toolbar click the Route Selection icon |
| 2. | Click the map to create the starting point for the route selection. As you hover over the map, a blue dotted line is displayed, directly linking the white circle to the cursor. Additionally, you will see a preview of the street segments that would be selected for that start and end point in a fainter shade of blue.  |
| 3. | Click a location on the map to select the segments along the route from the start point to the end point. The street segments that are part of the selected route are highlighted in blue on the map, and added to the selection list.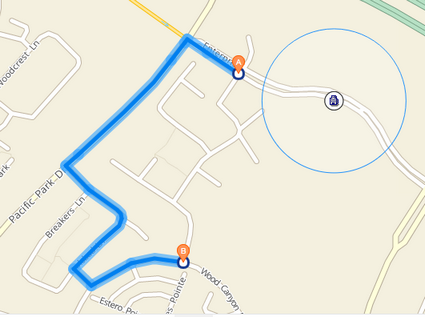 |
| 4. | To extend the segment selection, repeatedly click the white circle on either end of the selected segment, then click a location on the map. Or to move the selection, click within the selected segments to create a drag point, then drag one of the circles within the selection to the desired location. |
| 5. | Extend or change the selected street segments as desired, and use the Undo or Redo buttons if you want to undo or redo the last action that you performed, until you are happy with the selected segments. To finish the selection as part of a route and select additional individual segments, or another route, click anywhere on the map that is not part of the existing selection. |
The expansion controls can be used to expand the currently selected street segment to include more segments that are part of the same street or the entire street. The number of button controls available varies according to the size of the street selected (that is, the number of street links it contains). Between zero and three buttons are shown beside each item.
If the street you selected has more than one street segment that is not selected, the following control is shown:
| • |  Expand Street (Full Expansion): Selects all surrounding interconnected street segments for the street or highway, for which you have selected one or more of the segments. Expand Street (Full Expansion): Selects all surrounding interconnected street segments for the street or highway, for which you have selected one or more of the segments. |
If the street is larger and consists of many street segments, such as an arterial road or a freeway, one or both of the following controls might also be shown:
| • |  Expand Street (Conservative Expansion): Selects a small number of immediately surrounding street segments for the street or highway, for which you have selected one or more of the segments. Expand Street (Conservative Expansion): Selects a small number of immediately surrounding street segments for the street or highway, for which you have selected one or more of the segments. |
| • |  Expand Street (Medium Expansion): Selects a larger number, but not all, of the surrounding street segments for the street or highway, for which you have selected one or more of the segments. Expand Street (Medium Expansion): Selects a larger number, but not all, of the surrounding street segments for the street or highway, for which you have selected one or more of the segments. |
Hover over each button to see a preview of the links that will be selected if the button is used. These links appear blue on the map. When you have selected more than one street segment using any of the three street link selection options above, the street segments that make up the selection are nested under a parent item that details the street name, the range of street numbers covered by the selection (if available), their current speed limit, and their length. Click the toggle button to the left of the parent item to open and close the nested list:
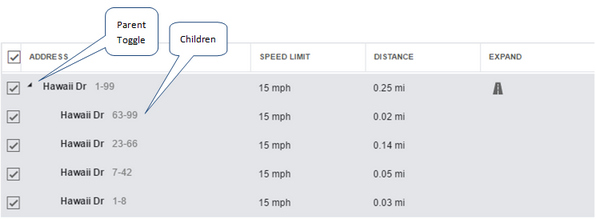
In the example above Hawaii Drive has been selected. This street comprises four street segments, and includes a range of street numbers from 1 to 99. The current speed limit of the street is 15 mph, and the total length of the selection is 0.25 miles.
If you remove one or more of the four street segments from the selection list (by clearing all links but one, then clicking the Remove Selected button), the expansion control returns, allowing the removed links to be reselected:
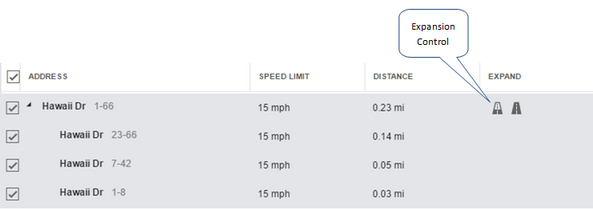
|
You can also click a selected street segment with the street picker (highlighting the street in blue) on the map to clear it. |
|
Speed limit and road status changes are not stored in the base map data, but rather in a separate cloud database uniquely associated with your account. When base map data is changed as a consequence of regular map data updates, it is possible for some or all of the your road edits to be rendered invalid (if, for example, a street you have edited has been removed, or if the ID numbers associated with an edited street or street segment have been changed).
If a change is detected that will impact any of the edits you have made, you will receive a notification that some or all of your edits are no longer valid. |
 Previous
 Next
Next Expand/Collapse
 Print
Print Share Page
 Training
 Knowledge

