Find Activity
|
This topic describes how to find vehicles that were at a location at a previous time. To find vehicles that are currently near a location,see Find nearest vehicles. |
You can use the Find Activity tool to get information about the locations of vehicles at a previous time.
To open the Activity tab you can do any of the following:
| • | Click Find Activity  (also called the What happened here tool) in the Map screen toolbar. (also called the What happened here tool) in the Map screen toolbar. |
| • | Search for a location using the Go To dialog box, and select Find activity near here from the info balloon that is displayed at the location. |
| • | Click Show List , Show Map & List (Horizontal),or Show Map & List (Vertical) control in the Map screen toolbar, then click the Activity tab in the lower part of the screen. |
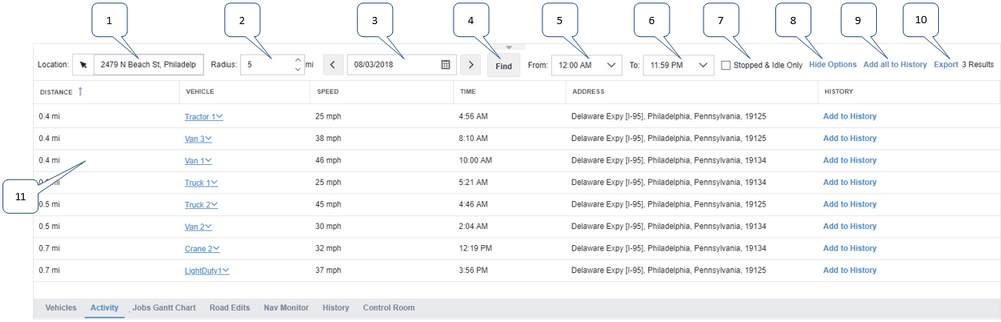
1: |
Specify the location where the activity occurred. If you clicked Find activity near here after a location search, this field is already filled in.
|
||||||||||||||||
2: |
Specify the radius of the activity search area. This is a circular search area centered on your chosen map location, address, marker, or vehicle location. Choose a radius of between 0.03 miles (50 meters) and 6.21 miles (approximately 10km). The default radius is 6.21 miles.
|
||||||||||||||||
3: |
Specify the date the activity occurred on. You can manually enter a date in the Date field, or click the Calendar icon |
||||||||||||||||
4: |
When the Location and Date fields are populated click Find. The vehicles that were near the specified place at the specified time are listed on the Activity tab. For details on how the entries in this list are chosen, see How is the list of search results populated? |
||||||||||||||||
5: |
Specify the earliest time of day the activity could have occurred. You can enter a time directly in the edit box, or click the down arrow |
||||||||||||||||
6: |
Specify the latest time of day the activity could have occurred. You can enter a time directly in the edit box, or click the down arrow |
||||||||||||||||
7: |
Select the Stopped & Idle Only check box to search for vehicles that were stopped or idling at the location. If this check box is selected the list will not show any vehicles that passed through the location but did not stop moving. If you clear this check box, the list shows all vehicles that were near the location. This check box is hidden by default, but is displayed when you click Show Options. |
||||||||||||||||
8: |
At the right of the controls is the Show Options or Hide Options link. Click Show Options to see all the controls. Click Hide Options to show only the Location, Radius, and Date fields and the Find button. |
||||||||||||||||
9: |
Click Add all to History to add all vehicles in the list to the vehicle history. This link is only displayed when search results are showing on the Activity tab. |
||||||||||||||||
10: |
The list of search results are displayed after you click Find. For each vehicle, this list shows:
|
 How is the List of Search Results Populated?
The vehicles that were active near the specified location during the specified time period are determined as follows:
|
 Previous
 Next
Next Expand/Collapse
 Print
Print Share Page
 Training
 Knowledge
 and use the date picker, or use the
  and
and  arrows to move to the correct day.