Quick Start Guide
This page is designed for new users who are unsure where to begin, and describes the initial steps you should complete when configuring your account for the first time, focusing on the setup of your fleet rather than on your account settings. This typically means creating a base HQ marker (or assigning other markers to a marker category that allows depots), creating accounts for your drivers, associating vehicles and drivers with your base marker, and associating vehicles and drivers with one another.
Once you have finished these configuration steps, you can perform basic fleet management and reporting tasks. You should also feel more comfortable navigating around this tool and its main screens. This guide can also be used as a helpful checklist reminder for more experienced users.
|
For quick access to all Verizon Connect product help, visit https://help.verizonconnect.com, or search through our knowledge base at https://knowledge.verizonconnect.com. |
Fleet Overview
Your fleet in this tool is a virtual representation of your actual real-world fleet: that typically means a collection of vehicles like trucks and vans, the employees who drive or work on these vehicles, and the various locations of your depots and customers. You might already know what your actual fleet looks like, and your account should already include some or all of your vehicles (shown on the Main section of the navigation bar > Vehicles screen). But before you can manage your new virtual fleet, you need to perform some configuration tasks, including:
| • | Specifying a location such as a main depot or head office as your base marker. |
| • | Assigning your vehicles to the base location. |
| • | Creating driver accounts. |
| • | Assigning drivers to your vehicles. |
Once these tasks have been completed, you can create additional markers at other important locations, such as at your customer sites. Markers are used to identify actual physical locations (generally street addresses, but also accepted as free-form areas and locations) that are important to your business.
Step 1: Create a Base Marker
Typically, the first thing you need to do when setting up your account is to create a marker at your main yard or depot. This is the location where your vehicles are normally based when they are not out driving, and where they start their days. If your drivers take their vehicles home at night, you can also create markers at their homes to allow a work day to start or end there.
To create markers from the Main section of the navigation bar > Map screen select Go To  on the map toolbar to open the Go To dialog box. Enter the street address of your home depot then select the arrow beside the text field.
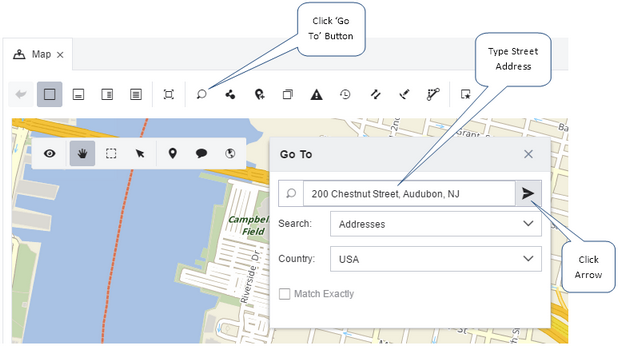
Select the address from the drop-down list. The map then zooms to the address, and a blue marker indicates the location.
If your home base does not have a street address, or the tools could not find it, you can create a marker. Zoom in or out of the map with the scroll wheel, and drag the map with your left mouse button to find the location. Select Markers  on the map toolbar then click the map to place the marker.

Select Create a marker here from the pop-up menu to open the Enter New Marker Details dialog box. Enter the marker name, such as "Home" or "HQ" into the Name field, then from the Primary Category field drop-down menu select "HQ". Select Create to create the marker. The marker is then ready to be used.
Any markers where a vehicle is based typically use this special category of "HQ". If you choose another category that has not been explicitly configured to include depot markers (from the Marker Categories screen), you cannot assign a vehicle to the marker.

Step 2: Assign a Vehicle to the Base Marker
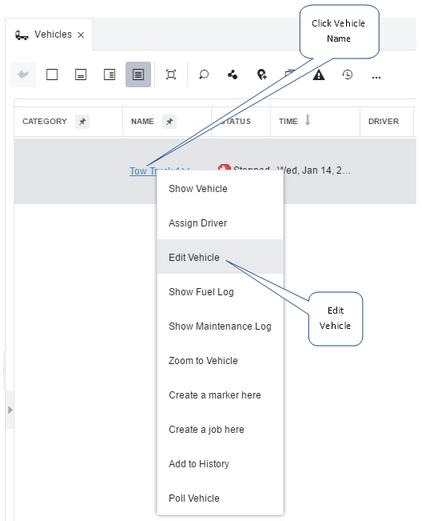
Now that you have created an HQ marker to represent your home base, you can go back to the Main section of the navigation bar > Vehicles screen and assign a vehicle to this marker. The assignment of a vehicle to a marker tells the fleet management system that the marker location is where the vehicle is based. On the Vehicles screen select the vehicle's name, then select Edit Vehicle from the pop-up menu.
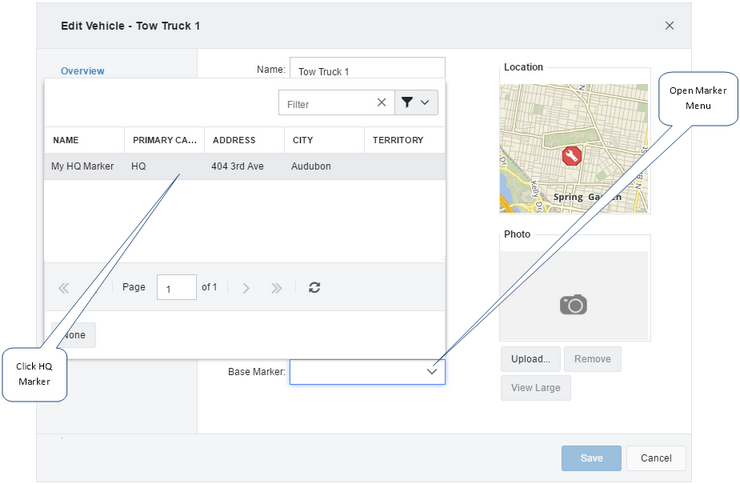
On the Edit Vehicle dialog box > Overview tab > Base Marker field, open the drop-down menu and select the name of the HQ marker you just created. Select Save. The vehicle is now based at the new marker. Next, assign a driver to the vehicle.
Step 3: Create a Driver Account
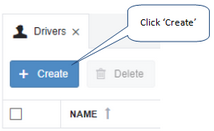
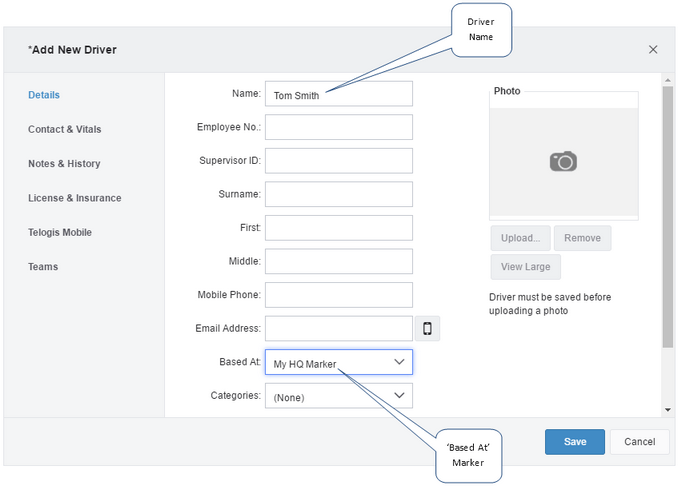
From the Main section of the navigation bar choose Drivers to open the Drivers screen. Click Create from the upper left corner of the screen to open the Add New Driver dialog box.
On the Details tab enter the name of the driver in the Name field. Open the Based At field drop-down list and select your new HQ marker. Usually, only HQ markers are shown on this list - markers of all other categories are hidden. The Name and Based At fields are the only required fields on this tab.
Select Save.
The new driver is shown on the Drivers screen. You can now assign the driver to the vehicle, because both the driver and the vehicle have been assigned to the same HQ category marker.
Step 4: Assign the Driver to the Vehicle
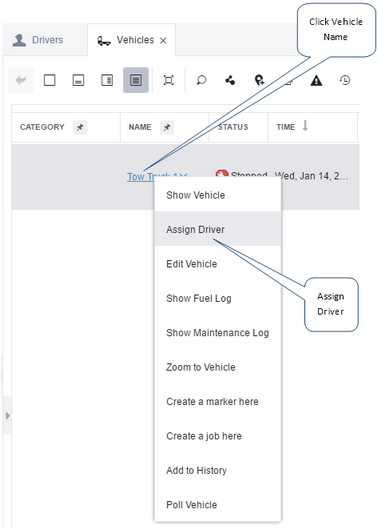
From the Main section of the navigation bar choose Vehicles then locate the vehicle you want to assign a driver to. This must be one of the vehicles you previously assigned to your new HQ category marker. Select the vehicle's name, then select Assign Driver from the pop-up menu. The Vehicle Driver Assigner dialog box opens.
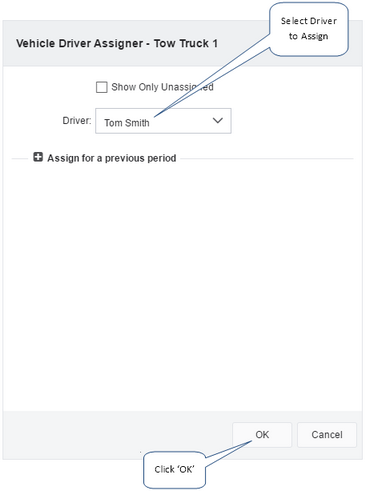
Open the Driver field drop-down list then select the name of your new driver. Select OK. The driver and the vehicle are now assigned to one another, and both are based at the same HQ marker.
Start Using the Fleet Management Tool
From the Main section of the navigation bar choose Home. From the Home screen you can see where the vehicle and driver are, and how far they have driven over the previous week. You can also run various reports on the vehicle and driver without further configuration, and use the history system to see where the vehicle has traveled, how fast it was driven, and the locations it stopped at.
Repeat the steps above if you have more vehicles and drivers to configure. If you have many other drivers and vehicles, you can create fleets and teams that they can belong to, from the Main section of the navigation bar > Fleets & Teams screen.
If you have the Verizon Connect® Response™ system, you can create new jobs at customer locations and assign them to your drivers and vehicles.
If you do not have the Verizon Connect® Response™ system, you can create routes between locations from the Main section of the navigation bar > Map screen. Select Routing  from the map toolbar, then to add locations click the map, or between named markers, or between drivers using their names, then send these turn-by-turn routing instructions to your drivers.
If you want to create additional accounts, or you want to enable drivers or supervisors to sign in to the platform, you need to create subuser accounts from the Tasks section of the navigation bar > Subusers screen. You can also assign subuser accounts to specific driver accounts if you plan to use a mobile app such as Verizon Connect® WorkPlan™. Your drivers can use this account to sign in to the app on their phone or tablet and receive their day's job details, or view their own driving performance (speeding, harsh braking and acceleration events, for example).
Seek More Help
This help system includes detailed instructions for performing all of the tasks offered by this fleet management tool. Use the Contents, Index, and Search tabs on the left side of the screen to navigate through the help system. If you need additional support, you can also contact us by email or telephone for help, to lodge a support ticket, or to request more training.
 Previous
 Next
Next Expand/Collapse
 Print
Print Share Page
 Training
 Knowledge