In addition to adding tags and notes to markers, you can also specify arbitrary custom attributes from the Marker Admin screen. Attributes are used to contain additional information about your markers, such as backup telephone or email contact details, customer time windows or opening hours, land areas, customer types, goods or equipment needed at the job location (other than the existing vehicle and driver requirements), or anything else you want.
Attributes use a data type, such as a check box, a numeric value, a text field, or a date or a time, or both. Once created and added to a marker, these custom values are stored by entering data into new form fields that are displayed on the Mini-map tab of the Marker Details dialog box.
The steps required to add a marker custom attribute are described below.
Creating a Custom Attribute
1.
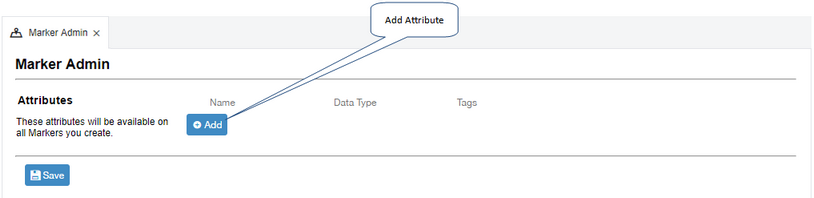
Select Marker Admin from the Tasks section of the navigation bar. The Marker Admin screen opens.
2.
Click the Add button. Three editable fields open below the "Name", "Data Type", and "Tags" column headers.
3.
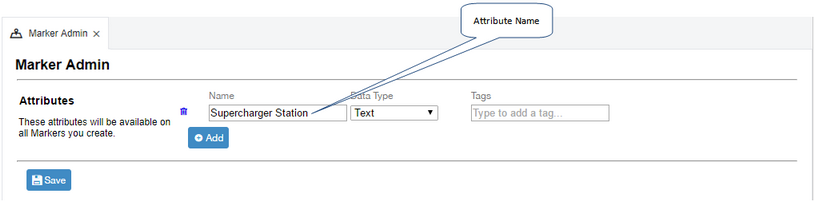
Type a name for your new attribute into the Name field; for example, "Charging Station" or "Maintenance Contact Details". This is the text that will be placed beside the attribute's form element on the Markers dialog box, so it should not be too long.
4.
Open the Data Type drop-down menu and choose the type of form element that will be used for the attribute's form element. You can choose from:
•
Number - this field allows only numerical characters (0-9, +/-) to be entered. Up and down buttons to the right of the field allow you to increase or decrease the numbers.
•
Text - this field accepts a single line of free-form text and numbers.
•
Multiline Text - this field accepts multiple lines of free-form text and numbers.
•
Checkbox - this field supports only two states: on and off (selected and cleared) and is typically used to describe the presence or absence of a marker property.
•
Date and Time - this field includes two inputs: one for a date and one for a time. The date input accepts the date in MM/DD/YY format (or the date format configured in your account) and includes a calendar picker for quickly selecting a date. The time input accepts a single time between 12AM and 11:45PM, selectable in 15 minute increments.
•
Date - this field accepts the date in MM/DD/YY format (or the date format configured in your account) and includes a calendar picker for quickly selecting a date using a mouse.
•
Time - this field accepts a single time between 12 AM and 11:45 PM, selectable in 15 minute increments, from a drop-down menu.
5.
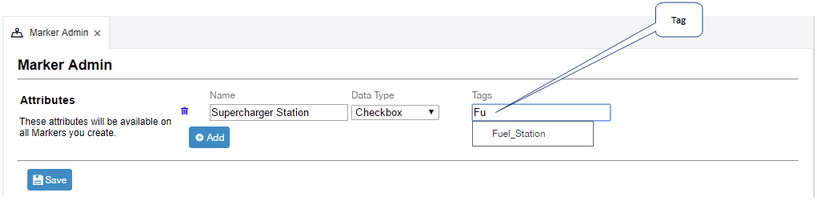
Click within the "Tags" field and begin typing the name of a tag you want to associate with the attribute. As you type, all tags matching the text you enter are shown and can be selected. Tags are only required if you want your new attribute to be available only on those markers that include a particular tag or tags. For example, you could ensure that an attribute called "Charging Station" could only be applied to markers with a tag of "Fuel Station", or an attribute of "Security Pass Required" only on markers with a tag of "Security Patrolled". If you do not add tags to the attribute, the attribute will be available to all markers. If you do add a tag, the attribute will not be available from the Add an Attribute dialog box if the marker does not already have the required marker tag.
Tags for your organization are created and managed from the Tags screen. These are not available to any other accounts. In addition to these customized tags, the platform includes many global tags that are available to all users of the platform. These global tags can only be added, removed, or edited by Verizon Connect personnel; not from the Tags screen.
6.
Click the Save button and the new attribute is saved in place. Open the Markers screen or the Map screen, and the new attribute is made available to existing or new markers from their Mini-map tabs, as described in the Adding and Editing Marker Attributes section.

 Previous
 Next
Next Expand/Collapse
 Print
Print Share Page
 Training
 Knowledge
