The Rights tab lets you configure what the user can do. This tab has three main sections:
| • | In the first section you can specify the roles that the user plays. This is the recommended method for assigning user privileges. |
| • | In the second section you can specify the rights and restrictions of the user to control which actions the user can perform. Any privileges you grant or deny here override the settings implied by the user's roles. |
| • | In the third section, two columns contain drop-down lists that let you control the member and item rights of the user for public items (public sharing). Any privileges you grant or deny here override the settings implied by the user's roles. |
Roles
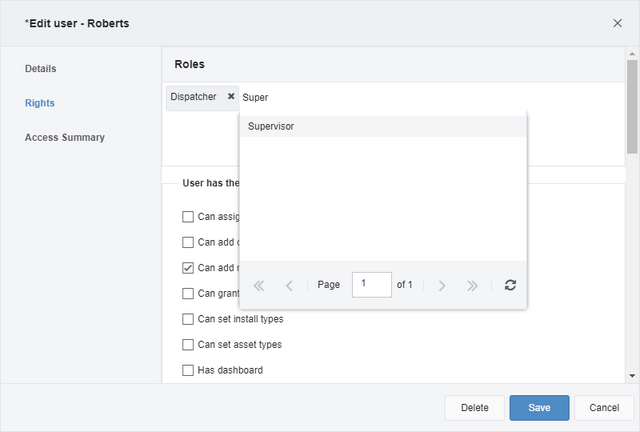
Roles are groups of privileges that you define using the Roles screen. When you assign a role to a user, that user gets all of the privileges associated with the role and is denied privileges that the role forbids.
| • | To assign a role to a user, click in the Click to add Role space and enter part of the tag name. As you type, a drop-down list opens, listing the tag names that match your entered text. Select a role from the drop-down list. The role badge is displayed. |
| • | To delete a role from a user, click the "X" on the role badge. |
Rights and Restrictions
The following tables list the different rights and restrictions that can be applied to a subuser. Different versions of this product allow you to configure different subsets of these rights and restrictions.
|
|
|
Can assign drivers
|
User can assign drivers to vehicles.
|
Can add drivers
|
User can create new drivers.
|
Can add markers
|
User can add markers to the map.
|
Can grant permissions for fleets and teams
|
User can control the visibility of fleets and teams (sharing).
|
Can set install types
|
User can assign install types to vehicles.
|
Can set asset types.
|
User can assign asset types to vehicles.
|
Can create/edit subusers
|
User can create additional subusers and edit their details. When this check box is clear, the user can only add or edit subusers using the hierarchy.
|
Can poll units
|
User can poll vehicles for additional reports beyond the regularly scheduled reports from the unit.
|
GF Co-Location report
|
User can see the GF Co-location report.
|
Can resolve panics
|
User is alerted when a panic button is pressed and can resolve vehicles in panic mode (taking them out of panic mode). Users with this right also have the right to generate custom report data on panic events.
|
Has dashboard
|
User can view key performance indicators in the dashboard. This option is only available when accessing the user dialog box from the hierarchy.
|
Can create/edit subusers
|
User can create new subuser accounts, and edit the details of existing subusers.
|
Can poll units
|
User can poll vehicles, requesting their location and status.
|
Fuel Card report - WEX
|
The user has access to the WEX fuel card report.
|
Can resolve panics
|
The user can close panic alerts triggered by vehicle drivers.
|
|
|
|
Can edit vehicle name
|
When editing vehicles, the user can change the name of vehicles along with other details. In some versions of this software, this privilege is controlled by a check box in the rights for public items section.
|
Can change vehicle color
|
The user can change the color of vehicle icons.
|
Can change vehicle tags
|
The user can assign or remove skill tags from vehicles.
|
Can set FollowMe markers
|
The user can set standard markers as FollowMe marker (a vehicle marker that moves).
|
|
|
|
Hide input activity
|
User does not see information from inputs on the unit.
|
Hide output activity
|
User cannot send signals to the unit or see which outputs it supports.
|
Hide reports
|
User does not have access to the reports screens.
|
Lite user
|
User is restricted to the Lite user set of features. For details on what these are, see Lite users and restricted XML.
|
Restricted XML output
|
User can only see the Restricted XML set of detailed vehicle information. For details on what this is, see Lite users and restricted XML.
|
Hide InSight Alerts
|
User cannot see InSight Alerts™.
|
Limit History Days
|
User can only see a specified number of days of history information. Select a time period from the drop-down list to specify how much history information the user can see.
|
|
|
|
Fleet Access
|
User can access the platform application (they can sign in).
|
Member and Item Rights
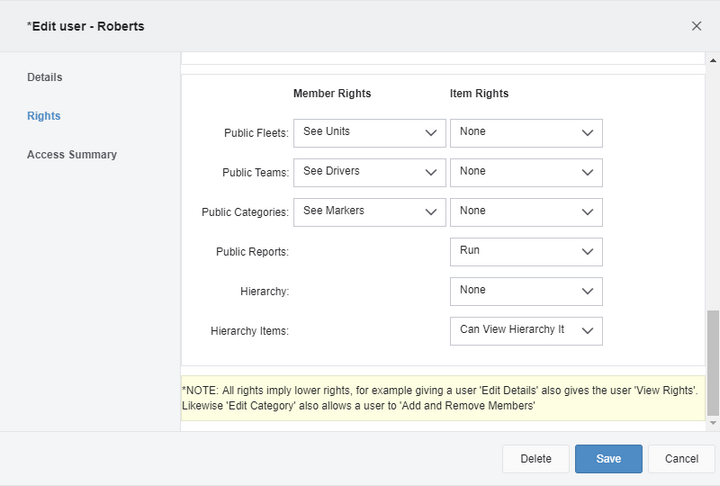
Rights to public items are divided into Member Rights (rights to work with the members of a group such as the vehicles in a fleet or the drivers in a team) and Item Rights (rights to work with the group itself). The following table lists the different rights you can grant for working with public items.

|
The two Hierarchy items listed in the table below (Hierarchy and Hierarchy Items) are not available when the Edit User dialog box is accessed from the Roles screen. To view these two options, the dialog box must be opened from within the Hierarchy itself. See the How to Permit Subuser Access to the Hierarchy section for information about the steps required to access these features.
|
|
|
|
|
Fleets or Teams
|
Can be any of the following:
| • | No Access: User has no access to view or work on the vehicles or drivers in public fleets or teams. |
| • | See <Members>: User can see vehicles or drivers in public fleets or teams, but cannot see their details. |
| • | View <Member> Details: User can see vehicles or drivers and can see their details, but cannot edit them. |
| • | Edit <Member> Details: User can see vehicles or drivers and can edit their details. |
|
Can be any of the following:
| • | None: User has no rights to change public fleets or teams. |
| • | Add or Remove <Members>: User can add or remove vehicles or drivers from the fleet or team, but not rename it. |
| • | Rename <Collection>: User can rename the fleet or team as well as adding or removing members. |
|
Categories
|
Can be any of the following:
| • | No Access: User has no access to view or work on the markers in public categories. |
| • | See Markers: User can see markers in public categories, but cannot see their details. |
| • | View Marker Details: User can see markers in public categories and can see their details, but cannot edit them. |
| • | Edit Marker Details: User can see markers in public categories and can edit their details. |
|
Can be any of the following:
| • | None: User has no rights to change public categories. |
| • | Add or Remove Markers: User can add or remove markers from public categories, but not edit the category. |
| • | Edit Category Details: User can edit the details on public marker categories. |
|
Reports
|
|
Can be any of the following:
| • | None: The user has no access to public reports. |
| • | Run: The user can run public reports, but not edit them. |
| • | Edit: The user can edit public reports, but not designate new reports as public or delete public reports. |
| • | Create and Delete: The user can edit, create, and delete public reports. |
|
Two additional hierarchy items (Hierarchy and Hierarchy Items) are not available when the Edit User dialog box is accessed from the Subusers screen. To view these two options, the dialog box must be opened from within the Hierarchy itself. See the How to Permit Subuser Access to the Hierarchy section for information about the steps required to access these features.
| • | Hierarchy: Use this drop-down menu to specify the level of access the subuser has to the hierarchy. Only available to hierarchy users. The five options available from this menu are:
|
| o | None - The user has no access to the Hierarchy screen. |
| o | Can View Hierarchy - The user can view the Hierarchy screen, but cannot make changes to nodes. |
| o | Can Edit Hierarchy - The user can add, move, or remove nodes and change node names. |
| o | Can Unassign Items - The user can unassign or change the assignment of users, vehicles, or drivers associated with hierarchy nodes. |
| o | Can Make Items Inactive - The user can make vehicles inactive, so that they are only visible in the hierarchy, but do not appear in any fleets. |
|
| • | Hierarchy Items: Use this drop-down menu to specify the access users are given to the items within the hierarchy. Only available to hierarchy users. The two options available from this menu are:
|
| o | Can View Hierarchy Items - The user can see the users, vehicles, and drivers that are unassigned or assigned to a node in their view of the hierarchy. |
| o | Can Edit Hierarchy Items - The user can edit the details of users, vehicles, and drivers that are unassigned or assigned to child hierarchy nodes. |
|
|
 Previous
 Next
Next Expand/Collapse
 Print
Print Share Page
 Training
 Knowledge


