Configuring Vehicles in the Maintenance Connect Wizard

The Maintenance Connect Wizard takes you through the steps for the following tasks:


Defining if you will receive a weekly InSight Alert report.
Adding selected vehicles to a service plan or removing selected vehicles from a service plan.
Specifying whether you would like to receive a weekly or monthly Fleet Maintenance Schedule report.
Defining the name and contact details of your organization's preferred mechanical service provider.
Connecting to your organization's preferred mechanical service provider.

If your preferred service provider's email details are entered into the wizard, they are also emailed copies of your fleet maintenance schedule and InSight Alert reports, if these reports are selected in the wizard.

To use the Maintenance Connect Wizard:
 

1.Click Connect Wizard in upper right corner of the screen to launch the Maintenance Connect Wizard.

 
The wizard dialog box opens, asking if you would like to begin configuring new vehicles to use the Maintenance Connect system. Click Yes to begin or No, Thanks to close the wizard.

 
2.Click Yes to open Alerts page. Select the check boxes beside the types of alert you would like to trigger an email alert notification, and a notification in your InSight Alerts inbox.

 
The four check box options you can choose on this page are:
 
oVehicle Performance. These alerts are triggered by non-critical vehicle alert conditions such as low battery voltage, incorrect tire pressure, low fluid levels, and mechanical fault conditions.
oService Centers. These are triggered when a vehicle arrives at, or leaves, its designated service center location. You must specify a service center location later in this wizard to use this option.
oTrouble Codes. These are triggered by critical vehicle alerts, such as air bag deployment, check engine light activation, or other DTC (Diagnostic Trouble Code) events.
oMaintenance Schedules. These are triggered when any of the vehicles in your fleet miss their scheduled maintenance appointments.
3.Click Next to move to the Service Plans page.

 
4.If you want to assign a vehicles to a service plan, find the vehicles using the fleet selector, the filter, or the list. To display only vehicles that have no service plan, select the Hide vehicles that already have a plan check box.
5.Select the check box next to the vehicles in the list and then click the Assign Plan button. The Assign Plan dialog box opens.

 
6.Select a service plan from the drop-down list and then click the Assign button.
7.Select additional vehicles and assign or remove service plans as required.
8.Click Next to move to the Reports page. On this page you can specify the types of reports you will receive about your fleet's maintenance. You can choose to receive a Fleet Maintenance Schedule report every week or month, and a weekly InSight Alert report. Once selected, these reports are scheduled to run automatically for you using the default PDF output format. They are also emailed automatically to the email addresses you enter into the next page of the wizard.

 
9.Click Next to move to the Connect page. Here you select your primary service center. Open the drop-down menu and select a center, or begin typing the name of the center into the field to filter through those available. If your preferred center is not present in the list, type its name into the text field. Enter a contact email for the center into the Contact Email field. Click Add Another Email to add more email addresses. These are the addresses that copies of the fleet maintenance report or Insight Alert report, or both, selected in the previous step are sent to, as well as your own.

 
10.Click Next again. If all required fields have been entered, a message is displayed indicating that the setup process is now complete.
11.Click Finish to close the wizard, or click Previous to return to any previous page and change any of the entered details.


Weekly and Monthly Fleet Maintenance Schedule Reports

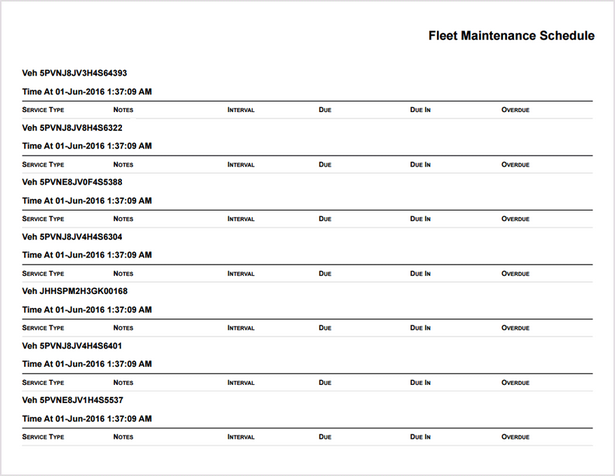
Fleet maintenance schedule reports list all schedules configured for vehicles in your fleet, and include details about the schedules and service types assigned to vehicles; the intervals specified between these schedules and when they are due (the calendar date, miles, or engine hours); the number of miles, hours, or days remaining until the schedule is due; and whether the schedule is currently overdue or not.

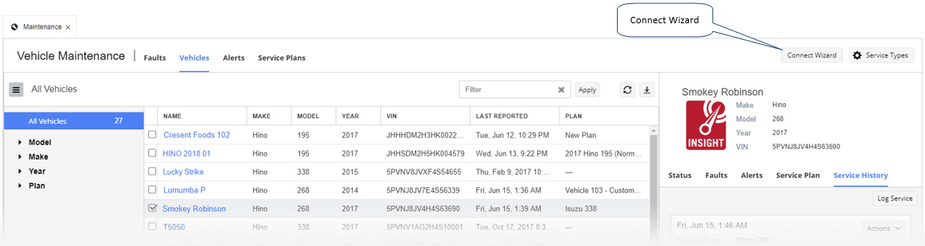
Once this report, or the InSight Alert report, has been configured in the Maintenance Connect Wizard, the settings can be edited. To do this, from the Reports section of the navigation bar choose Manage Reports. Click the Saved & Scheduled tab, select the Weekly/Monthly Fleet Maintenance Schedule report or Weekly InSight Alert report, then click Options on the toolbar. Select Report Options or Save & Schedule Options to open dialog boxes that let you edit which vehicles to include in the reports, the name of the reports, their email recipients and their delivery schedules, and which day of the week and time of the day to run the report.


Report Columns

The columns of the fleet maintenance schedule report are as follows:
 

1.Unit: The name of the vehicle (the name listed under the Tag column of the Vehicles screen, and the Vehicle Tag columns of the Faults, Schedules, and Inspections screens).
2.Time At: The local date and time at the vehicle location at the time the report was run.
3.Service Type: The service types of the vehicle's schedules. Each section of the report may include several service types for the various schedules that are configured for that particular vehicle (unit). For example. "Major Service", "Minor Service" and "Breakdown".
4.Notes: Any text notes associated with the service type.
5.Interval: The type of interval between services in months, miles, engine hours, or a combination of these. For example, "6 months", "2000 miles", "500 hours".
6.Due: The calendar date, number of hours or number miles until the next schedule is due, or a combination of these. For example, "10/10/2016" , "5000 miles", "100 hours", "300 hours, 400 miles", "300 miles, 12/01/2017". If the schedule is overdue, this text is shown in red.
7.Due In: The number of days, miles or engine hours remaining until the next service becomes due. For example, "21 days", "120 miles", "55 hours". If this value is a negative, for example, "-88 miles" or "-30 hours", this indicates that the service is overdue. If the value is negative, this text is shown in red.
8.Overdue: Indicates whether the service is overdue or not. Either "Yes" or "No". If "Yes", the text is shown in red.
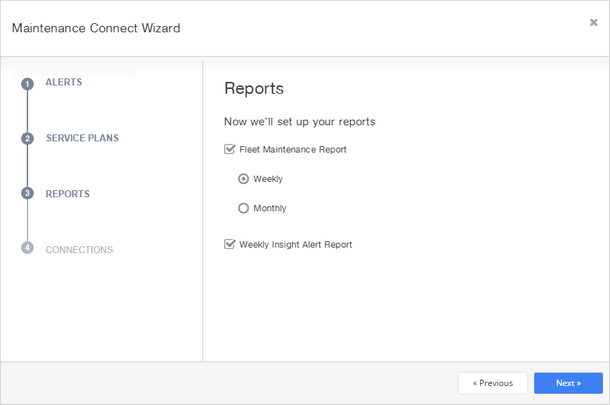