Hierarchy Screen

You might see either the current Hierarchy screen, described below, or the legacy Hierarchy screen depending on your account configuration.

From the Tasks section of the navigation bar choose Hierarchy to open the Hierarchy screen.

1:

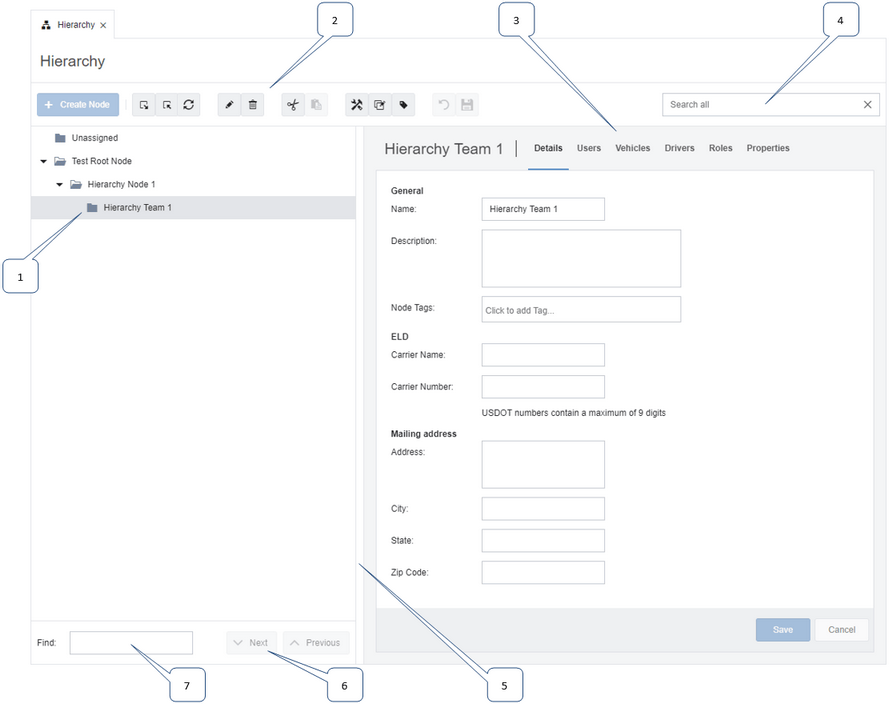
The tree visually represents your organization's hierarchy as an expanding structure consisting of nested nodes, with the currently selected node highlighted. Expand the tree and select individual nodes to specify the vehicles, users, drivers and roles assigned to these nodes, and to configure your ELD and summary report management settings.

In addition to the current account's primary root node, administrative users also see an Unassigned root node here that contains users, vehicles, drivers, and roles that are not currently assigned. When the Unassigned node is selected, the Create Node button is disabled, so you cannot create child nodes under the node.

2:

Select an option from the toolbar to perform a task on the selected node.

Create a new hierarchy node. Only three node levels are supported, including the root node, and creating a node is only permitted at the top two levels of the tree. The Create Node button is disabled when the Unassigned node is selected.

Fully expand the hierarchy tree, showing all nodes in the tree structure.

Collapse the hierarchy tree structure.

Refresh the tree structure to see any changes made but not yet reflected in the user interface. Note that only one user can edit the hierarchy at a time. If you try to make a change to the hierarchy while another user is already making an edit, an error dialog box opens.

Edit the name of the selected node. You can also edit the node name on the Details panel > Details tab.

Delete the selected node. Only nodes that are empty can be deleted. You must remove any child nodes before deleting a parent node. If you try to delete a node that is not empty, an error message is displayed.

This button cuts the selected node. This allows you to move the node to a new location in the hierarchy. You cannot cut the root node. Once a node is cut, you can paste it in its new location. Note that selecting Cut does not remove the node immediately. The node does not move until you paste it into its new location.

This button pastes the cut node into its new location. Select the node in the hierarchy that will become the cut node's parent, then select Paste. The cut node becomes a child node of the selected node. Note that an error message is displayed if pasting the node would result in the maximum node depth being exceeded.

Configure the selected node. Select this button to open a configuration dialog box where you can specify KPI targets for the selected node. See Setting KPI Values.

Select this button to open the Bulk Edit dialog box. You can then change the icon color for all vehicles in the fleet associated with the selected node. Select a color from the grid, or select use default value. Select OK.

Select this button to open the Tag Hierarchy Item dialog box. You can then can add or remove tags from vehicles and drivers in the selected node. See Tagging Hierarchy Items.

Undo the last action performed. Select this button repeatedly to undo multiple actions. Only actions performed since the tree structure was last saved can be undone. This option is only available in accounts that support this feature.

Save the current tree structure. This option is only available in accounts that support this feature.


3:

Use the Details panel to work with the users, vehicles, drivers, and roles that are assigned to nodes in the hierarchy. The Details panel consists of the following tabs that organize node information into categories:
 

Details lets you edit the node name and write a description of the node. If you are using WorkPlan as an ELD (electronic logging device) you can also specify your ELD carrier details here.
Users lets you assign subuser accounts to the node, remove them, or move them to another node. You can also create a new subuser account from here.
Vehicles lets you assign existing vehicles to the node, remove them, or move them to another node. You can also perform a number of vehicle tasks from this tab including specifying vehicle KPI targets, setting vehicle install and asset types, bulk editing vehicle icon colors, setting vehicle base markers, and toggling vehicles between active and inactive states.
Drivers lets you assign drivers to the node, remove them, or move them to another node. You can also set the base markers of drivers, and create new drivers.
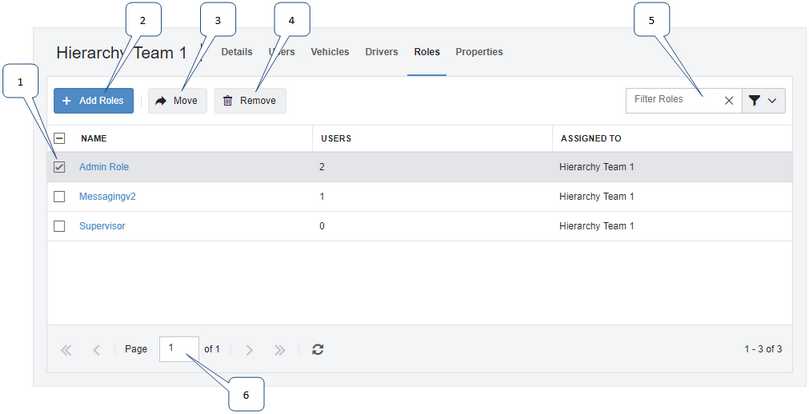
Roles lets you assign a role to a node. Roles that are assigned to a hierarchy node give members of that role access to information about the fleets or teams associated with a node, and any child nodes below it. By assigning roles that have been added to a hierarchy node to a user, you grant that user permission to see parts of the hierarchy that are not below that user's node, or even permit visibility to subusers who are not assigned to any hierarchy node at all.
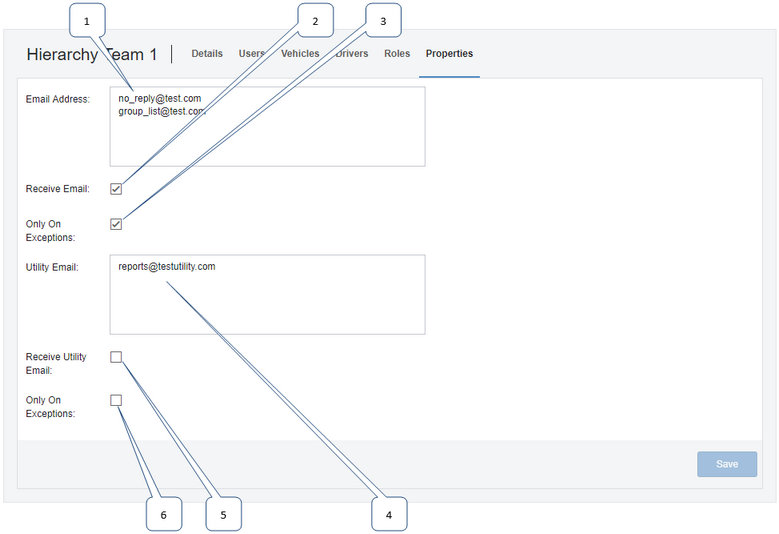
Properties lets you specify who dashboard daily status reports will be sent to, and when they will be sent, if you are using the dashboard.

Information on the Details panel is often presented in a table. You can select a column header to sort the values in the table, or use the buttons and drop-down menus in the toolbar to make changes to the items in the table.

The Hierarchy screen supports drag-and-drop functionality, which can help you to perform various operations. For example, to assign a vehicle to a node in the hierarchy, drag the vehicle's row in the Details panel > Vehicles tab to the node in the tree. You can also drag drivers, users, and roles to hierarchy nodes. Changes are saved automatically.

4:

Use the search field to find users, vehicles, drivers, and roles by name or by tag. When you enter a search term the search results are displayed immediately in a pop-up menu below the search field. Search results in the pop-up menu are listed according to their category, under the Users, Vehicles, Drivers, and Roles headings. For each search result, the name of the node they are assigned to is also displayed. If a search result is not assigned to a node, the text "Unassigned" is displayed instead. Select a search result to open the node that contains the item.

5:

Click the divider between the two panels and drag left or right to adjust the width of the panels.

6:

Select Next or Previous to navigate through the nodes whose names match the search term you entered in the Find field.

7:

Use the Find field to search for node names, or part of node names. Enter the search term in the field then click Next or Previous to navigate through the matching nodes. Alternatively, press the Enter key to navigate through the results.

Details

1:

The name of the selected node.

2:

The description of the node.

3:

The tags that have been associated with the node. You can click in the field to additional tags. This field is not included in all subscriptions.

4:

The legal name that your company uses when conducting commercial business. In the US, this name is used by the FMCSA when viewing ELD data to cross check against the company's USDOT number. This field is automatically filled with the details defined for your company on the ELD tab of the Settings dialog box, or with the details of the parent node, and is only visible if your account includes a subscription with ELD support.

If your organization has a Digital Tachograph subscription, you can provide your company card number and the European country that issued your card number here. These fields are automatically filled with the details defined for your company on the Digital Tachograph tab of the Settings dialog box, or with the details of the parent node.

1:

The unique 16-character company number assigned to the organization that owns the vehicles being driven.

2:

The state that issued the company's card number. This field is disabled until you have entered a 16-digit company card number. If you have entered a company card number, you must also enter the issuing state (that is, either both values must be supplied, or neither).

5:

Your company's identification number, which uniquely identifies the company employing the drivers assigned to this node and using an ELD. In the US, this number is issued by the United States Department of Transportation. This field is automatically filled with the details defined for your company on the ELD tab of the Settings dialog box, or with the details of the parent node, and is only visible if your account includes a subscription with ELD support.

6:

Your company's physical mailing address, including its city, state, and zip code components, used to register your organization with your local carrier administration agency. In the US, this agency is the FMCSA, and the company address is directly linked to its USDOT number. These fields are automatically filled with the details defined for your company on the ELD tab of the Settings dialog box, or with the details of the parent node, and are only visible if your account includes a subscription with ELD support.

Users

1:

Select this check box if you want to remove the user from the node, or move the user to another node.

2:

Select Add Users to open the Add Users dialog box. Select the users you want to assign to the node. Use the Filter Users field or the node filter field, or both, to refine the list of users.

3:

Select the check boxes beside the names of users you want to move, then select Move to open the Move User dialog box. Select the node you want to move the users to, then select Move Here. Alternatively, you can use the drag-and-drop functionality to move individual users, or groups of selected users, to a new node in the hierarchy tree. You are not asked to confirm this action.

4:

Select the check boxes beside the names of the users you want to remove, then select Remove to open the Unassign dialog box. Select Yes to confirm the action, or No to cancel the action. The removed user accounts are not deleted, and can be reassigned later if needed.

5:

Select More Actions to view further tasks that can be performed for this node. Options in the pop-up menu are:
 

Create - Opens the Add Users dialog box, where you can configure a new subuser account.

6:

Use the Filter Users field to find subusers. Enter all or part of the user's account name, full name, email address, node assignment, or driver assignment.

7:

Enter a page number in the Page field to navigate to that page, or use the Previous and Next arrows to navigate between pages.

To use the column picker menu to save your preferred grid order, click the header drop-down arrow, then select the Save Visible Columns, Save Sort Order, or Save Column Order check boxes, or any combination of these. When you next sign in, the layout you choose is retained.

Vehicles

1:

Select this check box if you want to remove the vehicle from the node, or move the vehicle to another node.

2:

Click Add Vehicles to open the Add Vehicles dialog box. Select the vehicles you want to assign to the node. Use the Filter Vehicles field or the node filter field, or both, to refine the list of vehicles.

3:

Select the check boxes beside the names of vehicles you want to move, then select Move to open the Move Vehicle dialog box. Select the node you want to move the vehicles to, then select Move Here. Alternatively, you can use the drag-and-drop functionality to move individual vehicles, or groups of selected vehicles, to a new node in the hierarchy tree. You are not asked to confirm this action.

4:

Select the check boxes beside the names of the vehicles you want to remove, then select Remove to open the Unassign dialog box. Select Yes to confirm the action, or No to cancel the action. The removed vehicles are not deleted, and can be reassigned later if needed.

5:

Select More Actions to view further tasks that can be performed for this node. Options in the pop-up menu are:
 

Configure - Opens the Configuration dialog box, which is used to specify KPI values for the selected vehicle.
Toggle Active - Switches the selected vehicles between an active and inactive state. The state of vehicles assigned to a node is indicated by the value ("Active" or "Inactive") in the Active column on the Details panel. When a vehicle has been set to "inactive" it is assigned to the "inactive" fleet on the Fleets & Teams screen, and can no longer be used for job or route assignment. Inactive vehicles are not shown on the Vehicles list until they are changed back to an active state.
Set Install Type - Opens the Set Install Type dialog box, from which you can specify an install type of the selected vehicles
Set Asset Type - Opens the Set Asset Type dialog box, from which you can specify the asset type of the selected vehicles.
Bulk Edit - Opens the Bulk Edit dialog box, from which you can set the icon color to represent the selected vehicles. Select a color from the grid, or select use default value. Select OK.
Set Base Marker - Opens the Set Base Marker dialog box, from which you can specify the marker where the selected vehicles will be based. Drivers and vehicles must be based at the same markers to be assigned to one another.

6:

Use the Filter Vehicles field to find specific vehicles. Enter all or part of the vehicle's name, its driver's name, the vehicle's registration number, serial number, base marker name, year, make, model, color, install and asset types, or tags assigned to it.

7:

Enter a page number in the Page field to navigate to that page, or use the Previous and Next arrows to navigate between pages.

To use the column picker menu to save your preferred grid order, click the header drop-down arrow, then select the Save Visible Columns, Save Sort Order, or Save Column Order check boxes, or any combination of these. When you next sign in, the layout you choose is retained.

Drivers

1:

Select this check box if you want to remove the driver from the node, or move the driver to another node.

2:

Select Add Drivers to open the Add Drivers dialog box. Select the drivers you want to assign to the node. Use the Filter Drivers field or the node filter field, or both, to refine the list of drivers.

3:

Select the check boxes beside the names of drivers you want to move, then select Move to open the Move Driver dialog box. Select the node you want to move the driver to, then select Move Here. Alternatively, you can use the drag-and-drop functionality to move individual drivers, or groups of selected drivers, to a new node in the hierarchy tree. You are not asked to confirm this action.

4:

Select the check boxes beside the names of the drivers you want to remove, then select Remove to open the Unassign dialog box. Select Yes to confirm the action, or No to cancel the action. The removed drivers are not deleted, and can be reassigned later if needed.

5:

Select More Actions to view further tasks that can be performed for this node. Options in the pop-up menu are:
 

Create - Opens the Add New Driver dialog box, where you can configure a new subuser account.
Set Base Marker - Opens the Set Base Marker dialog box, from which you can specify the marker where the selected vehicles will be based. Drivers and vehicles must be based at the same markers to be assigned to one another.

6:

Use the Filter Drivers field to find specific drivers. Enter all or part of the driver's name, employee number, phone number, email address, base marker, vehicle or subuser assignment, or tags assigned to it.

7:

Enter a page number in the Page field to navigate to that page, or use the Previous and Next arrows to navigate between pages.

To use the column picker menu to save your preferred grid order, click the header drop-down arrow, then select the Save Visible Columns, Save Sort Order, or Save Column Order check boxes, or any combination of these. When you next sign in, the layout you choose is retained.

Roles

1:

Select this check box if you want to remove the role from the node, or move the role to another node.

2:

Select Add Roles to open the Add Roles dialog box. Select the roles you want to assign to the node. Use the Filter Roles field or the node filter field, or both, to refine the list of roles. When a role is assigned to a node, subusers who are also assigned the role are granted permissions to see the content of nodes they would not otherwise be granted access to.

3:

Select the check boxes beside the names of roles you want to move, then select Move to open the Move Role dialog box. Select the node you want to move the role to, then select Move Here. Alternatively, you can use the drag-and-drop functionality to move individual roles, or groups of selected roles, to a new node in the hierarchy tree. You are not asked to confirm this action.

4:

Select the check boxes beside the names of the roles you want to remove, then select Remove to open the Unassign dialog box. Select Yes to confirm the action, or No to cancel the action. The removed roles are not deleted, and can be reassigned later if needed.

5:

Use the Filter Roles field to find specific roles. Enter all or part of the role's name, the name of users assigned the role, or the nodes the role is already assigned to.

6:

Enter a page number in the Page field to navigate to that page, or use the Previous and Next arrows to navigate between pages.

To use the column picker menu to save your preferred grid order, click the header drop-down arrow, then select the Save Visible Columns, Save Sort Order, or Save Column Order check boxes, or any combination of these. When you next sign in, the layout you choose is retained.

Properties

1:

The email addresses where detailed dashboard daily status reports about this node are sent. Each address should be entered on a new line.

2:

Select this check box to specify that the recipients listed in the Email Address field are sent all detailed dashboard daily status reports.

3:

Select this check box to specify that the recipients listed in the Email Address field receive detailed dashboard daily status reports only if the report includes an exception.

4:

The email addresses where restricted "minimal" dashboard daily status reports about this node are sent, if they do not contain sensitive information and are suitable for third-party recipients such as utilities and contractors. Each address should be entered on a new line.

5:

Select this check box to specify that the recipients listed in the Utility Email field are sent all minimal dashboard daily status reports.

6:

Select this check box to specify that the recipients listed in the Utility Email field receive minimal dashboard daily status reports only if the report includes an exception.