An access path is a custom route restriction, typically used to connect a marker location with a street location. The access path dictates the direction of travel permitted along itself by vehicles. This direction can be bidirectional, allowing travel in either direction along the path, or directional: permitting either entry to, or departure from, the marker to an external location on the road network.
This feature allows users to control where vehicles can and cannot enter and exit from the marker's area to the surrounding road network.
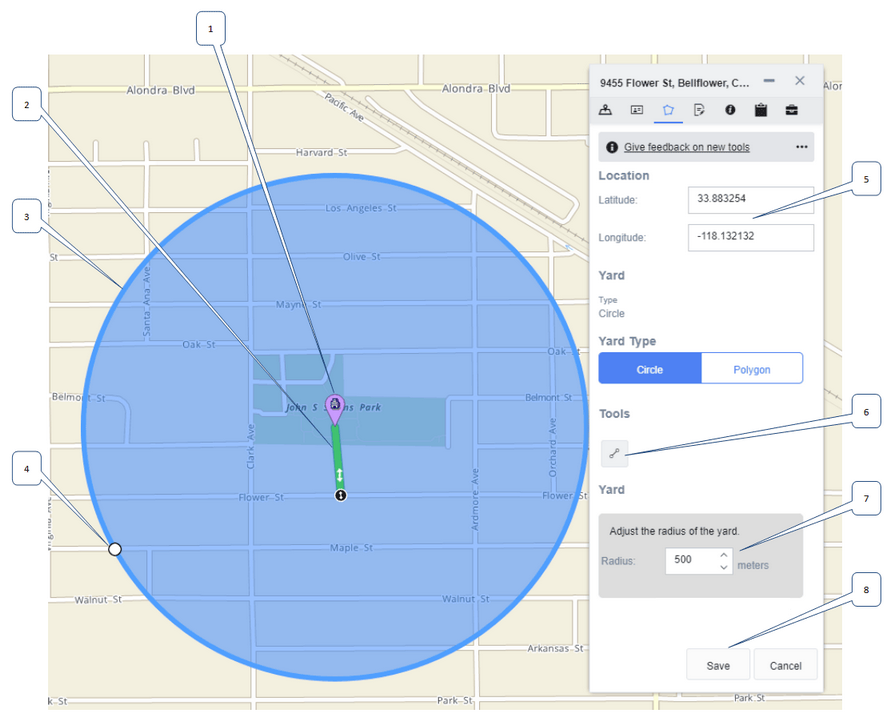
When you create a marker, a default access point is automatically created. This default access path links the marker to the closest point on the road network in a straight line. You can edit the default access path and you can add additional access paths.
To edit an access path, click the green access path line and perform one of the following actions:
Adding an Access Path
To create a new access path:
| 1. | In Edit mode, click the Access Path icon  . . |
| 2. | Click the marker then drag the light green line to the point on the road network where you want vehicles to enter or exit the marker's yard. |
| 3. | A green line connects the marker and the road network in a straight line. You can now create an additional access path or edit the access path. |

|
If you want to create an access path that enters the road network at the point that is closest to the marker, select the Snap to street check box on the Shape tab > Access Path section. You must have the access path selected and the access path must not have any drag points.
|
Changing the Direction of an Access Path
To change the direction of travel for an access path:
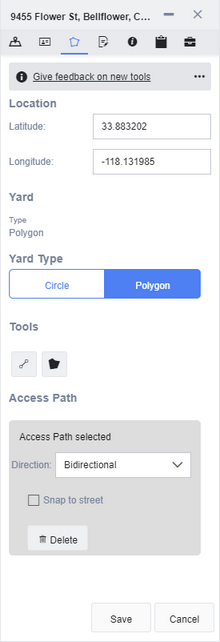
| 1. | Make sure you are on the Shape tab in Edit mode. |
| 2. | Click the green access path line on the map to select it. |
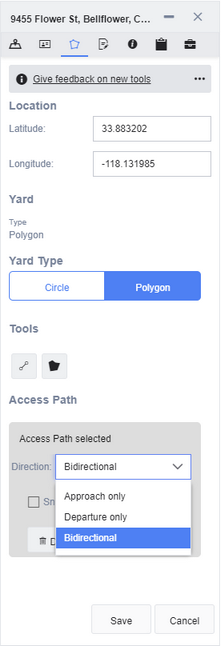
| 3. | In the Marker Details pop-up > Access Path section, set the Direction field to one of these values: "Bidirectional", "Approach only", or "Departure only".
|
| 4. | Click Save. The direction of travel you choose is reflected by the color of the access path on the map (dark green for departure only, and light green for bidirectional or approach), arrows above the path indicating the direction of travel permitted, and a direction icon at the point at which the path meets the road. |
|
You can also right-click the access path to open a context menu and change the direction of the access path.
|
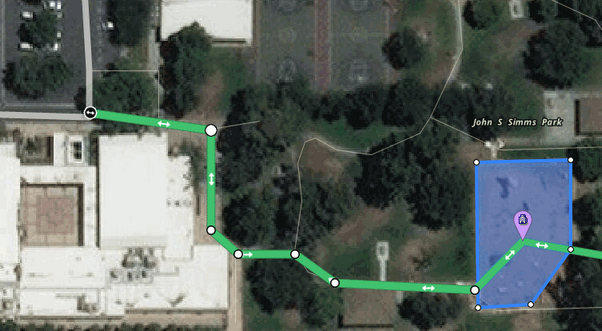
Manually Drawing an Access Path
It is useful to manually draw access paths in cases where the roads within a marker's yard do not exist in the map data, because they are driveways or private roads. When you manually draw access paths you can specify an exact custom route around a larger area, such as a parking lot or depot yard.
To manually draw an access path:
| 1. | Make sure you are on the Shape tab in Edit mode. |
| 2. | Click the green access path line on the map to create a drag point. |
| 3. | Drag this point to the desired location. |
| 4. | Create more drag points and drag them to points along the access path route on the map, until you have created the desired access path.
|
| 5. | Click Save in the Marker Details pop-up. |
|
| • | To remove a drag point right-click the point and select Delete point. |
| • | To change the location where the access path intersects the road network, click the black circle on the road and drag it to the desired location. |
|
Deleting an Access Path
To delete an access path:
| 1. | Make sure you are on the Shape tab in Edit mode. |
| 2. | Click the green access path line on the map to select it. |
| 3. | In the Marker Details pop-up under Access Path click Delete.
 |
|
You can also delete an access path using the following methods:
| • | Right-click the access path to open a context menu and select Delete access path. |
| • | Click the access path to select it and hit the DEL or Delete key on your keyboard. |
|
|
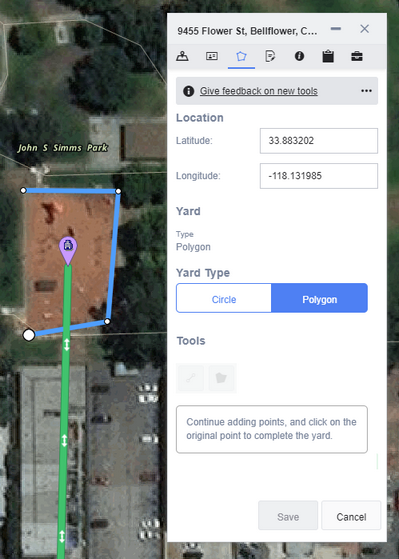
 Changing a Circle Marker to a Polygon Marker
 Previous
 Next
Next Expand/Collapse
 Print
Print Share Page
 Training
 Knowledge